The Best Fluffy Pancakes recipe you will fall in love with. Full of tips and tricks to help you make the best pancakes.
Beef Tenderloin Guide: Reverse Sear Method for Perfect Results
You just dropped $120 on a single piece of meat. Your palms are sweating. Your in-laws arrive in three hours. The last thing you need right now is generic cooking advice that turns your beef tenderloin into an expensive leather boot.
Forget everything you’ve read about blasting beef tenderloin at 450°F and hoping for the best. I’m going to show you why the reverse sear method isn’t just a trendy technique—it’s your insurance policy against ruining the most expensive cut in the butcher case.
After 12 years as a professional butcher and culinary instructor, I’ve seen hundreds of home cooks make the same mistakes with beef tenderloin roast. But here’s the good news: once you understand the science behind this cut, it’s actually one of the most forgiving roasts you can master.
What is Beef Tenderloin? The Cut Explained
Definition: Beef tenderloin is the most tender cut of beef, harvested from the psoas major muscle running along the cow’s spine. Because this muscle performs minimal work during the animal’s lifetime, the meat remains exceptionally lean and buttery in texture, though milder in flavor compared to marbled cuts like ribeye. It responds best to high-heat searing followed by gentle indirect roasting.
This Premium cut sits beneath the ribs and doesn’t bear weight, which explains its melt-in-your-mouth quality. When left whole, it’s called a whole beef tenderloin. When cut into steaks, you get filet mignon—the same muscle, different presentation.
Key Characteristics:
- Texture: Supremely tender, almost buttery
- Flavor: Mild and clean (less beefy than ribeye)
- Fat Content: Very lean with minimal marbling
- Price Point: $25-40 per pound (trimmed)
- Best Uses: Special occasions, holiday dinners, impressive presentations
Cooking Method Showdown: Traditional vs. Reverse Sear
Before you preheat that oven, let’s talk strategy. Not all roasting methods deliver the same results, and understanding your options will transform your confidence in the kitchen.
| Method | Final Texture | Total Cook Time | Difficulty Level | Best For |
|---|---|---|---|---|
| Traditional High Heat | Gray outer edge, pink center only | 45-50 minutes | Easy (but risky) | Weeknight dinners when time matters |
| Reverse Sear | Wall-to-wall rosy pink throughout | 90-110 minutes | Medium (worth it) | Guests, holidays, and perfectionists |
| Sous Vide + Sear | Precise edge-to-edge doneness | 2-3 hours | Advanced (equipment needed) | Ultimate control freaks |
Why Reverse Sear Wins: Traditional methods cook from the outside in, creating temperature gradients. You end up with a bullseye effect—perfectly cooked center surrounded by gray, overcooked meat. The reverse sear method flips the script: low temperature first brings the entire roast to your target temperature evenly, then a blazing-hot sear creates that caramelized crust without overcooking the interior.
How Much Beef Tenderloin Per Person?
Let’s talk portions before you buy. Nothing’s worse than running short—or spending $200 when you needed half that amount.
Portion Calculator:
For Trimmed, Ready-to-Cook Tenderloin:
- 8 oz (½ pound) per person for main course
- 6 oz per person if serving multiple proteins
- 10 oz per person for hearty eaters
For Untrimmed Tenderloin (with silverskin and chain):
- 12 oz (¾ pound) per person to account for 25-30% trim loss
- Example: For 8 guests, buy a 6-pound untrimmed roast
Pro Tip: The “tail” end (thinner portion) cooks faster and reaches well-done while the thick center stays medium-rare—perfect if you’re serving mixed preferences.
How to Trim and Tie (Truss) Your Roast Like a Butcher
Most beef tenderloin comes with a thin membrane called silverskin. It’s inedible and contracts during cooking, causing the meat to bow. You must remove it.
The 3-Step Trim Process:
- Remove the Chain: The loose, fatty strip along one side pulls off easily by hand. Save it for stir-fry or trim for your dog.
- Slice Away Silverskin: Insert your knife under the silver membrane at a shallow angle. Glide the blade along the surface, keeping it close to the silverskin while angling away from the meat. Work in smooth strokes.
- Truss for Even Cooking: Tuck the thin tail underneath and tie at 2-inch intervals with butcher’s twine. This creates uniform thickness for consistent doneness.
Visual Guide Needed? The loop, twist, and pull motion takes 10 seconds once you’ve practiced twice. If you’re visual, search “butcher’s knot tutorial” for a quick 30-second video reference.
The “Reverse Sear” Method Explained: Science Meets Flavor
Here’s where we separate amateur cooks from confident ones. The reverse sear method isn’t complicated—it just requires patience and a meat thermometer.
Phase 1: The Slow Roast (Building the Foundation)
Temperature: 250°F (low and slow)
Goal: Bring internal temperature to 10°F below your target doneness
- Pat the roast completely dry with paper towels
- Season aggressively with coarse salt and cracked black pepper (the crust starts here)
- Place on a wire rack over a rimmed baking sheet
- Insert a leave-in meat thermometer into the thickest part
- Roast uncovered until it reaches 115-120°F for medium-rare (approximately 60-90 minutes)
Why Uncovered? Covering traps moisture and steams the surface. We want a dry exterior that sears beautifully.
Phase 2: The Sear (Creating the Crust)
Temperature: Blazing hot—500°F oven or cast-iron skillet
Goal: Deep golden-brown crust without raising internal temperature
- Remove roast from oven and tent loosely with foil
- Crank your oven to 500°F OR heat a cast-iron skillet until smoking
- Sear all sides for 1-2 minutes each until deeply browned
- Rest for 10-15 minutes before slicing
The Secret: That initial slow roast dries the surface. When you sear, you’re not fighting surface moisture—you’re creating pure Maillard reaction caramelization.
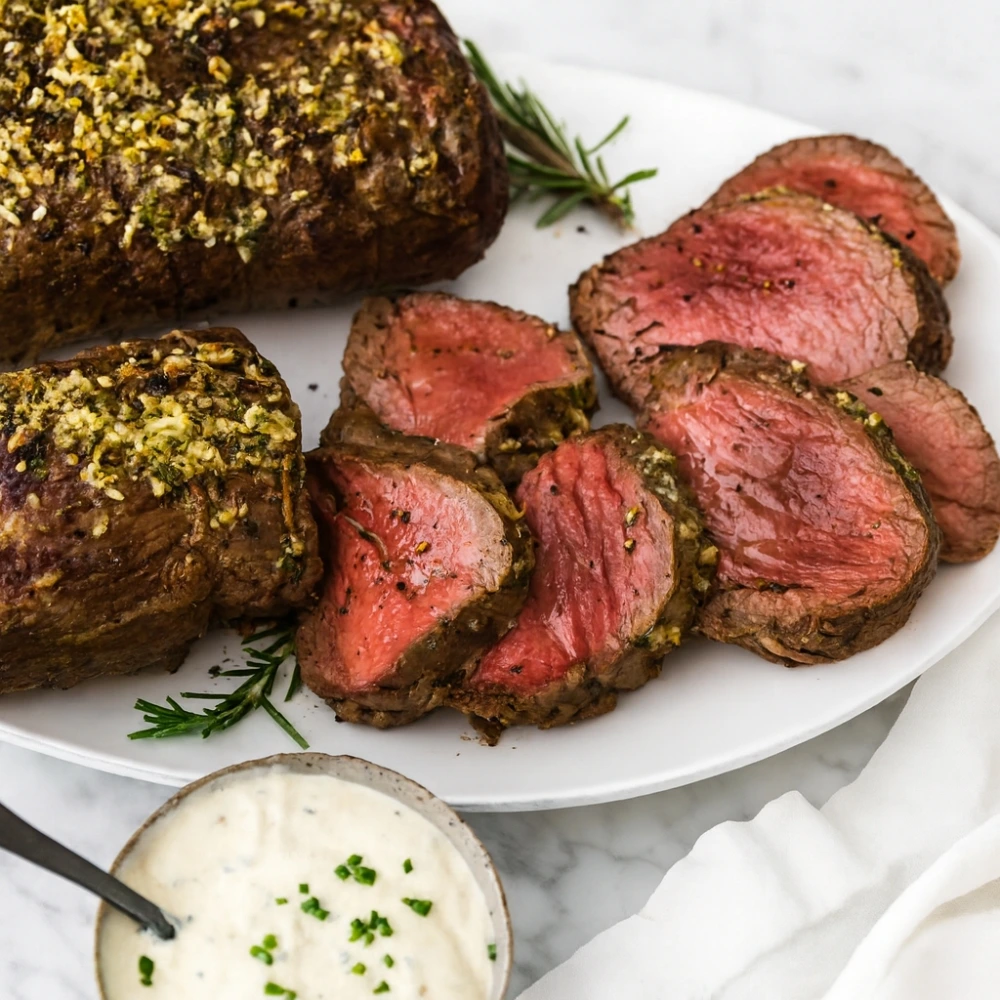
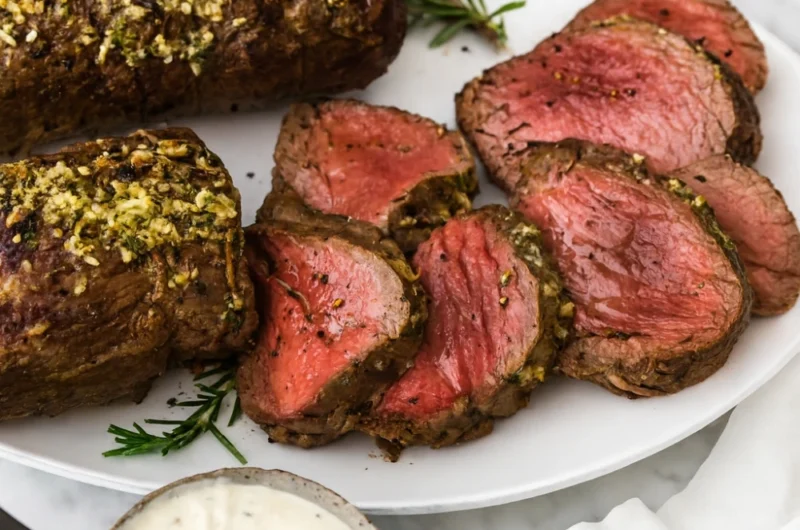
Beef Tenderloin Temperature Chart: Your Doneness Decoder
Use an instant-read thermometer and pull the roast 5-10°F below target. Carryover cooking during the rest period will bring it home.
| Doneness | Pull Temperature | Final Temp After Rest | Description |
|---|---|---|---|
| Rare | 115-120°F | 120-125°F | Cool red center |
| Medium-Rare (IDEAL) | 120-125°F | 130-135°F | Warm red-pink center |
| Medium | 130-135°F | 135-140°F | Warm pink throughout |
| Medium-Well | 140-145°F | 145-150°F | Slightly pink center |
| Well-Done | 150°F+ | 155°F+ | No pink (why though?) |
Bold Recommendation: Pull your beef tenderloin at 125°F internal temperature. After resting, you’ll hit a perfect 130-135°F medium-rare with a rosy center that makes guests gasp.
Choose Your Finish: Three Flavor-Bomb Sauces
Plain beef tenderloin is elegant. Beef with a killer sauce? That’s memorable.
Option A: Cowboy Butter (The Crowd-Pleaser)
Combine softened butter with minced garlic, Dijon mustard, fresh thyme, parsley, and a pinch of red pepper flakes. Slather over sliced beef or serve on the side for dipping.
Why it works: Fat + acid + herbs = flavor explosion that complements the mild beef.
Option B: Red Wine Reduction (Classic Elegance)
Reduce 2 cups red wine with shallots, beef stock, and fresh thyme until syrupy. Finish with cold butter and a splash of balsamic vinegar.
Pairing note: Cabernet Sauvignon or Merlot work beautifully both in the sauce and in your glass.
Option C: Horseradish Cream (Effortless Punch)
Mix sour cream, prepared horseradish, lemon juice, and chives. Done in 3 minutes.
Best for: Those who want bold flavor without cooking a separate component.
Why You Should Skip Marinades on Beef Tenderloin
Controversial take incoming: marinades ruin beef tenderloin.
Here’s why: acidic marinades (lemon juice, vinegar, wine) work by breaking down muscle fibers. But beef tenderloin is already fork-tender. Add acid, and you don’t tenderize—you turn the texture mushy and mealy.
What to do instead:
- Dry brine with salt 4-24 hours before cooking (enhances natural flavor)
- Use herb butter or compound butter as a finish (adds richness after cooking)
- Let the beef’s natural flavor shine with simple salt, pepper, and garlic
Exception: If you’re using a fat-based “marinade” (olive oil, herbs, garlic) without acid for 2-4 hours, that’s technically just a flavored coating—perfectly fine.
FAQ: Common Beef Tenderloin Mistakes (And How to Avoid Them)
Do you cook beef tenderloin covered or uncovered?
Uncovered, always. Covering traps steam, preventing the dry surface needed for proper browning. The only time you cover is during the resting period after cooking.
Should I bring beef tenderloin to room temperature first?
No—this is outdated advice. A cold roast from the fridge actually develops a better crust because the surface stays cooler longer during searing. Plus, leaving meat at room temperature for 1-2 hours is a food safety gray area.
Can I cook beef tenderloin ahead of time?
Yes, with the reverse sear method. Do the slow roast phase up to 2 hours ahead, then sear just before serving. The roast can rest at room temperature (tented) while you finish sides.
What if I don’t have a meat thermometer?
Get one. Seriously—beef tenderloin costs too much to guess. A $15 instant-read thermometer is cheaper than ruining a $120 roast.
The Final Word: Your Beef Tenderloin Success Checklist
Before you slide that roast into the oven, verify you’ve covered these bases:
✓ Trimmed all silverskin (inedible membrane removed)
✓ Trussed for even thickness (tail tucked and tied)
✓ Seasoned generously (salt, pepper, and garlic)
✓ Thermometer inserted (into thickest part)
✓ Plan for resting time (10-15 minutes before slicing)
✓ Sauce prepared (choose your flavor bomb)
✓ Sharp carving knife ready (clean slices = professional presentation)
Who Am I, and Why Trust This Method?
Hi, I’m a former professional butcher and culinary instructor with 12 years of experience teaching home cooks how to master intimidating cuts. I’ve broken down thousands of beef tenderloins, cooked hundreds more, and listened to countless stories of holiday dinner triumphs and disasters.
The reverse sear method isn’t my invention—it’s adapted from professional kitchens and modernist cooking techniques. But I’ve refined it for home cooks who want restaurant results without culinary school training.
My promise: Follow this method exactly once. Compare it to any previous experience you’ve had with roast beef. If you don’t agree this produces the most evenly cooked, tender, and impressive beef tenderloin roast you’ve ever made, send me a message and tell me where it went wrong.
Ready to Level Up? Explore These Related Guides
- How to Trim Silver Skin from Any Cut of Beef – Master the knife technique in 5 minutes
- 5 Best Sauces for Roast Beef Beyond the Basics – From chimichurri to bourbon-peppercorn
- Best Red Wines to Pair with Filet Mignon – Sommelier-approved pairings under $30
Your $120 investment deserves more than crossed fingers and generic advice. Treat beef tenderloin with the respect it demands, follow the science, and you’ll create a centerpiece that turns dinner into an event.
Now go make something extraordinary.
Beef Tenderloin Guide: Reverse Sear Method for Perfect Results
Course: DinnerCuisine: AmericanServings
8
servingsPrep time
20
minutesCooking time
35
minutesCalories
450
kcalIngredients
1 whole beef tenderloin, trimmed, 1.8–2.3 kg (4–5 lb)
2½ tsp kosher salt
2 tsp freshly ground black pepper
2 tbsp olive oil
4 tbsp unsalted butter
4 garlic cloves, lightly smashed
2 sprigs fresh rosemary
4 sprigs fresh thyme
2 tsp Dijon mustard (optional, for crust)
Butcher’s twine (for tying; optional but recommended)
Optional finish
Flaky salt, to serve
1–2 tsp freshly cracked peppercorn blend
Directions
- Prep & (Optional) Tie: Pat the tenderloin dry. Trim any silver skin. For even thickness, fold the thin tail end under and tie the roast every 4–5 cm (1.5–2 in) with twine.
- Season: Rub all over with kosher salt and pepper. For best flavor, refrigerate uncovered 12–24 hours (dry-brine). If short on time, proceed immediately.
- Preheat: Set oven to 220°C / 425°F.
- Sear: Heat olive oil in a large oven-safe skillet over medium-high. Sear the tenderloin 1–2 minutes per side until browned all over (including ends).
- Butter & Herbs: Add butter, garlic, rosemary, and thyme to the pan. Tilt the pan and baste the roast with the foaming butter for 60–90 seconds. If using, brush a thin layer of Dijon over the top for a subtle crust.
- Roast: Transfer the pan to the oven. Roast 12–18 minutes, checking early. Target 48–50°C / 118–122°F in the center for a pull temp that will carry to medium-rare.
- Rest: Move roast to a board; spoon herb butter over. Tent loosely with foil and rest 15 minutes. Carryover should reach 52–54°C / 125–130°F (medium-rare).
- Slice & Serve: Remove twine. Slice into 1.5–2 cm (½–¾ in) medallions. Finish with flaky salt and cracked pepper to taste. Serve with pan juices.
- Notes: If you prefer other doneness, aim to pull at:
- Rare: 46–48°C / 115–118°F (carry to 49–51°C / 120–124°F)
- Medium: 54–56°C / 130–133°F (carry to 57–60°C / 135–140°F)