The Best Fluffy Pancakes recipe you will fall in love with. Full of tips and tricks to help you make the best pancakes.
Beef Brisket Recipe: Oven, Slow Cooker, & Smoker Methods
Perfect beef brisket requires low, slow cooking to transform tough connective tissue into tender, flavorful meat. Choose your method: Oven (5-6 hours) for crispy bark, Slow Cooker (8-10 hours) for convenience, or Smoker (10-12 hours) for authentic BBQ. Cook until internal temperature reaches 203°F/95°C, rest before slicing, and always cut against the grain.
Brisket is the most unforgiving cut of beef. Cook it wrong, and you’ll end up with something resembling shoe leather—dry, chewy, and utterly disappointing. Cook it right, and it transforms into pure meat candy: tender, juicy, and so flavorful it’ll make you wonder why you ever settled for anything less.
I understand the intimidation factor. Looking at a $50 piece of raw brisket can make anyone nervous. The first time I attempted a smoked brisket, I watched it like a hawk for twelve hours, only to slice into what I can only describe as beef jerky’s tougher cousin. The experience was humbling, expensive, and made me question my entire cooking journey.
But here’s what makes this guide different: unlike other brisket recipes that show you just one way to cook this magnificent cut, I’m going to explain the actual science of tenderness so you can achieve perfect results whether you’re using an oven, slow cooker, or smoker. Understanding why brisket behaves the way it does is the secret to mastering it.
The “Brisket Decision Matrix”: Which Method is For You?
Before we dive into techniques, let’s match you with the right cooking method based on your priorities:
| Method | Best For | Time Required | Skill Level |
|---|---|---|---|
| Oven | Crispy bark + tender meat, holiday dinners | 5-6 hours | Intermediate |
| Slow Cooker | “Set it and forget it” convenience, weeknight meals | 8-10 hours | Beginner |
| Smoker | Authentic BBQ experience, weekend projects | 10-12 hours | Advanced |
The Science of “Why” (Understanding Brisket Biology)
Here’s where most recipes fail you—they tell you what to do without explaining why. Let’s change that.
Collagen is the key to everything. This white connective tissue runs throughout the brisket, and it’s what makes this cut so tough initially. But here’s the magic: when you cook brisket low and slow, that collagen gradually melts into gelatin, creating that melt-in-your-mouth texture we’re after.
The transformation happens around 160-180°F/71-82°C, but patience is crucial. Rush it with high heat, and the muscle fibers will seize up and squeeze out moisture faster than the collagen can break down. The result? Dry, tough meat.
“The ‘stall’ is not your enemy—it’s actually proof that chemistry is working in your favor.”
Speaking of which, let’s talk about the stall. Around 160°F/71°C, your meat thermometer will seem to stop climbing. Sometimes it stays there for hours, and panic sets in. Don’t worry—this is completely normal. The stall occurs because of evaporative cooling: moisture is leaving the surface of the meat, which cools it down at the same rate the heat is raising the internal temperature. This is where the Maillard reaction also occurs, developing that beautiful bark and complex flavors. Many pitmasters wrap their brisket in foil or butcher paper during the stall to push through it faster.
Step 1: Choosing Your Cut (The Flat vs. The Point)
A whole brisket (called a “packer brisket”) consists of two distinct muscles:
- The Flat: Leaner, more uniform thickness, perfect for even slicing. This is what you typically see in delis.
- The Point: Fattier, more marbling, sits on top of the flat. This is where burnt ends come from—those crispy, caramelized cubes of brisket heaven.
Pro Tip: Buy the whole packer brisket for the best value and most versatility. You’ll get both cuts in one, and the fat cap will protect the meat during cooking. If you want easier slicing and less trimming, buy just the flat, but know that you’re sacrificing some of that rich marbling.
Look for good marbling—those white flecks of intramuscular fat. They’ll render during cooking and keep your brisket moist. Aim for USDA Choice grade at minimum, though Prime grade offers even better marbling if your budget allows.
Step 2: The Dry Rub (The Flavor Foundation)
A great dry rub doesn’t need to be complicated. In fact, traditional Texas BBQ uses just salt and coarse black pepper. But for maximum flavor development, here’s my master rub recipe:
Master Brisket Rub
- 3 tablespoons brown sugar
- 2 tablespoons smoked paprika
- 2 tablespoons kosher salt
- 2 tablespoons coarse black pepper
- 1 tablespoon garlic powder
- 1 tablespoon onion powder
- 1 teaspoon cayenne pepper (optional, for heat)
- 1 teaspoon ground cumin
Here’s the critical part most people miss: apply your salt in advance. This is called dry brining, and it’s a game-changer. Salt draws moisture to the surface, dissolves, and then gets reabsorbed along with the salt, seasoning the meat from within. Apply your rub at least 4 hours before cooking, ideally overnight. The salt needs time to work its way into the meat fibers.
Step 3: Cooking Instructions (The “How-To”)
Method A: The Oven Method (Jewish/Holiday Style)
This is my go-to for oven brisket when I want tender meat with less fuss than smoking but more control than a slow cooker.
- Preheat: Set your oven to 300°F/150°C.
- Sear: Heat a large skillet over high heat. Sear the brisket on all sides until deeply browned (about 4 minutes per side). This creates flavor through the Maillard reaction.
- Build the braising base: In a roasting pan, layer sliced onions, carrots, and celery. Place the seared brisket on top, fat side up.
- Add liquid: Pour in 2 cups of beef broth or red wine. The liquid should come about 1/3 of the way up the brisket.
- Cover tightly: Seal the pan with heavy-duty foil, creating a tight seal to trap steam.
- Cook: Roast for 5-6 hours until the brisket reaches 203°F/95°C internal temperature.
- Rest: Let it rest for 30 minutes before slicing.
Method B: The Slow Cooker Method (Weeknight Hero)
The slow cooker brisket method is perfect for busy schedules. You lose some bark formation, but you gain convenience.
- Prep: Apply your dry rub the night before.
- Layer: Place sliced onions in the bottom of your slow cooker. Set the brisket on top, fat side up.
- Add flavor: Combine 1 cup beef broth, 1/2 cup BBQ sauce, and 1 teaspoon liquid smoke. Pour over the brisket.
- Cook: Set to LOW and cook for 8-10 hours. The brisket should be fork-tender and easily pull apart.
- Optional crispy finish: Remove the brisket, brush with BBQ sauce, and broil for 5 minutes to create some exterior texture.
Pro Tip: If your slow cooker runs hot, check after 7 hours. Overcooked brisket will fall apart—great for tacos, but not ideal for slicing.
Method C: The Smoker/Grill (Weekend Warrior)
This is smoked brisket at its finest—the method that built BBQ legends.
- Set up your smoker: Target temperature is 225°F/107°C. This is the golden standard for low and slow cooking.
- Choose your wood: Hickory and oak are traditional choices. Hickory gives a stronger smoke flavor, while oak is milder. Avoid mesquite for brisket—it’s too intense for such a long cook.
- Place the brisket: Fat side up (this protects the meat and bastes it as it renders).
- Smoke unwrapped: For the first 5-6 hours, let the smoke work its magic. This is when the bark forms.
- Wrap at the stall: When the internal temperature hits 160-170°F/71-77°C, wrap in butcher paper or foil. This is called the “Texas Crutch,” and it helps push through the stall.
- Continue cooking: Until the internal temperature reaches 203°F/95°C, usually 4-6 more hours.
- The probe test: When a thermometer probe slides in like butter with no resistance, it’s done. Temperature is important, but this tactile test is the real indicator.
The Most Important Step: Resting & Slicing
If you slice your brisket hot, you ruin it. This isn’t an exaggeration—it’s science.
During the resting period, the meat fibers relax and reabsorb moisture. Cut too soon, and all those precious juices spill out onto your cutting board instead of staying in the meat. Rest your brisket for at least 30 minutes, wrapped in foil and towels. An hour is even better. Some pitmasters rest for 2-3 hours in a cooler.
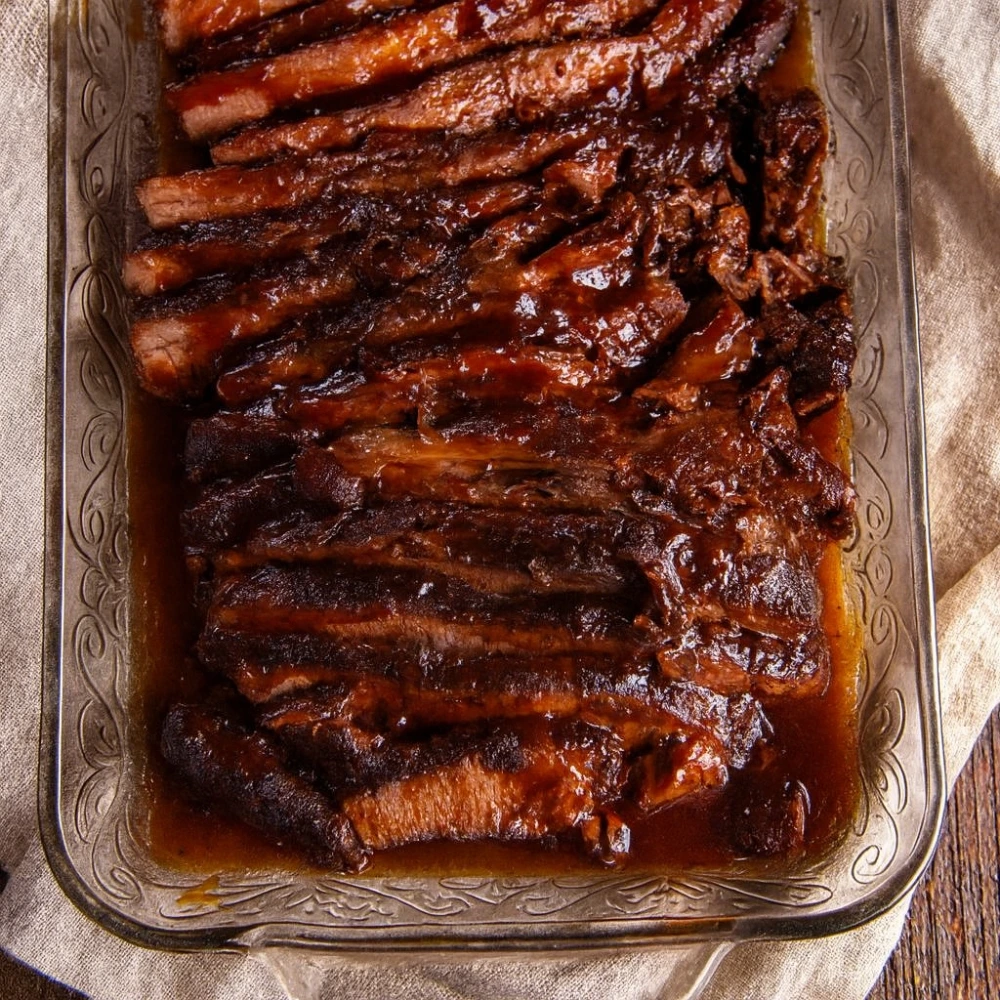
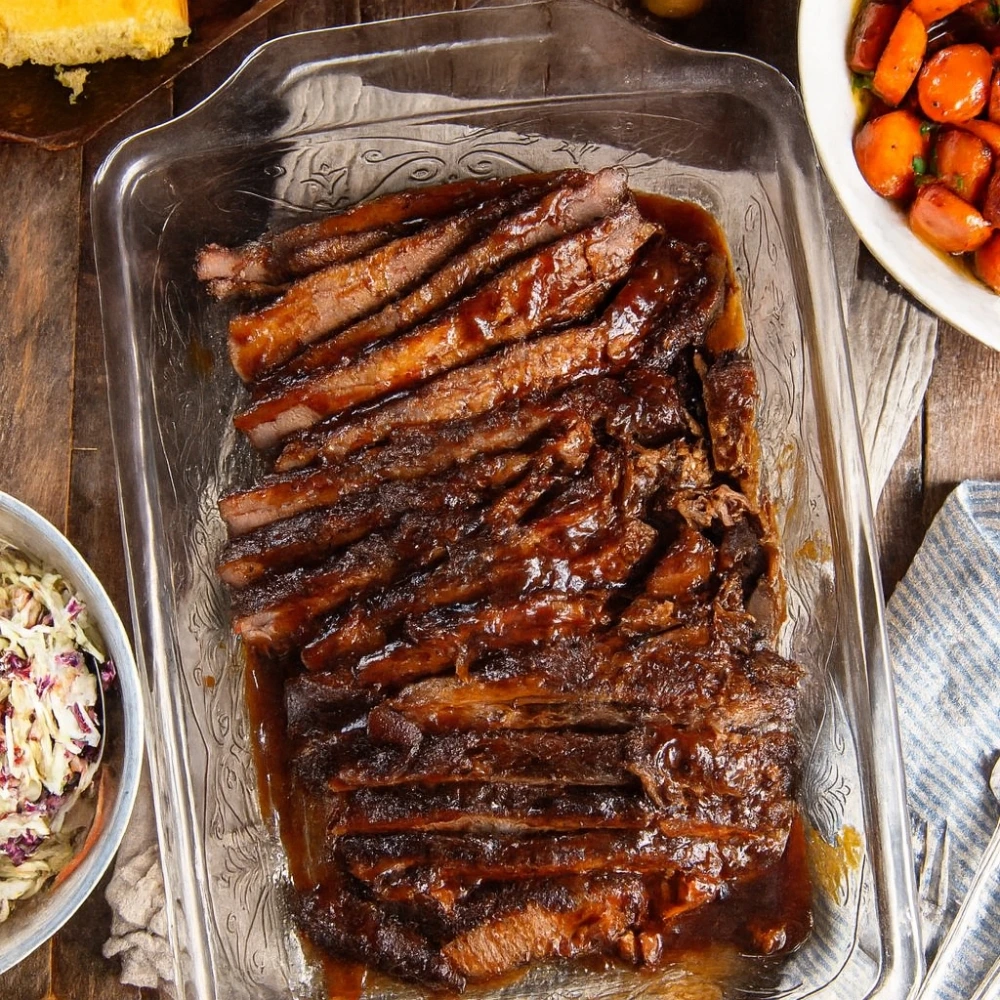
Finding the grain direction: Look closely at your brisket. You’ll see parallel lines running through the meat—these are the muscle fibers. Your goal is to slice perpendicular to these lines. Slicing against the grain shortens the muscle fibers, making each bite tender. Slice with the grain, and you’ll be chewing through long, tough fibers.
- Use a sharp slicing knife
- Aim for slices about 1/4-inch thick (pencil width)
- The flat and point have different grain directions—rotate your brisket as needed
Troubleshooting: Why is My Brisket Tough?
Even experienced cooks encounter problems. Here’s how to diagnose and prevent common issues:
Q: My brisket is dry.
A: You likely cooked it too fast at too high a temperature, or you didn’t wrap it during the stall. High heat squeezes moisture out faster than collagen can break down. Next time, keep your cooking temperature lower and consider wrapping at 160°F.
Q: My brisket is chewy and tough.
A: You didn’t cook it long enough for the collagen to fully break down. Brisket needs to reach 203°F/95°C internal temperature. Don’t trust time alone—use a thermometer and the probe test. Temperature is your friend here.
Q: My brisket falls apart when I try to slice it.
A: It’s overcooked. While this makes incredible shredded beef for tacos or sandwiches, it’s not ideal for presentation slices. Try reducing your cooking time slightly or pulling it off heat when it hits 200-203°F rather than going higher.
Leftover Ideas (Beyond Sandwiches)
If you’re lucky enough to have leftover brisket (though in my house, that’s rare), here are creative ways to use it:
- Brisket Tacos: Chop or shred the meat, warm in a skillet with a splash of beef broth, and serve in corn tortillas with pickled onions and cilantro.
- Brisket Mac & Cheese: Fold chopped brisket into your favorite mac and cheese recipe. The smoky, rich meat takes this comfort food to another level.
- Brisket Hash: Dice brisket and crispy-fry with potatoes, onions, and bell peppers. Top with a fried egg for the ultimate breakfast.
- Brisket Fried Rice: Use brisket instead of pork or chicken in fried rice for a Texas-Asian fusion that’ll blow your mind.
- Brisket Chili: Chop brisket into chunks and add to your chili recipe for incredible depth and texture.
Final Thoughts
Mastering beef brisket isn’t about following a recipe blindly—it’s about understanding the transformation happening inside that tough cut of meat. Whether you choose the convenience of a slow cooker, the controlled environment of an oven, or the traditional romance of a smoker, the principles remain the same: low heat, adequate time, and patience.
The collagen needs to break down. The connective tissue needs to melt. The internal temperature needs to reach that magic 203°F mark. And above all, you need to resist the temptation to slice too early.
Remember my first failed brisket? These days, I can produce consistently tender, flavorful brisket every single time—not because I’m gifted, but because I learned the science and respected the process. Now it’s your turn.
Fire up your cooking device of choice, grab that beautiful piece of brisket, and let the transformation begin. Your patience will be rewarded with something truly special: meat that’s tender enough to pull apart with a fork, rich with the deep flavors that only slow cooking can develop, and satisfying in a way that makes every minute of cooking time worth it.
Have questions about your brisket cooking adventure? Drop them in the comments below—I love helping fellow brisket enthusiasts troubleshoot their way to perfection!

Beef Brisket Recipe: Oven, Slow Cooker, & Smoker Methods
Course: DinnerCuisine: AmericanServings
10
servingsPrep time
20
minutesCooking time
6
hoursCalories
520
kcalIngredients
1 whole beef brisket, about 5 lb (2.3 kg), trimmed to ~¼ in (6 mm) fat cap
Dry Rub
2 Tbsp kosher salt
1 Tbsp coarse black pepper
1 Tbsp sweet paprika
2 tsp garlic powder
2 tsp onion powder
1 Tbsp brown sugar
1 tsp chili powder
¼ tsp cayenne pepper (optional)
Braising Base
2 large onions, sliced
6 garlic cloves, smashed
2 cups (480 ml) beef broth
2 Tbsp Worcestershire sauce
1 Tbsp apple cider vinegar
2 bay leaves
Pros
(Use this section only for editorial reviews.)
Deep, smoky-savory flavor with minimal hands-on work
Very forgiving; stays juicy when cooked low and slow
Great make-ahead; improves after an overnight rest
Feeds a crowd and slices beautifully for platters
Leftovers are versatile (sandwiches, tacos, hash)
Directions
- Prep & rub (Day before or morning of): Pat the brisket dry. Mix the dry rub and coat all over, pressing it in. Refrigerate uncovered at least 2 hours (overnight best).
- Heat oven: Preheat to 300°F / 150°C.
- Build the pan: Scatter onions and garlic in a large roasting pan or Dutch oven. Add broth, Worcestershire, vinegar, and bay leaves. Set a rack or lay the brisket fat cap up over the onions.
- Seal & cook: Cover tightly with a lid or double foil. Roast 3 hours.
- Check & continue: Baste with pan juices, re-cover, and roast another 2–3 hours, until the thickest part is probe-tender (a skewer slides in with little resistance) and internal temp is roughly 195–203°F / 90–95°C.
- Rest: Transfer the brisket to a board, tent with foil, and rest 30 minutes.
- Defat the jus: Skim fat from the pan juices (or chill briefly and lift hardened fat). Discard bay leaves.
- Slice: Slice against the grain into ¼ in (6 mm) slices.
- Serve: Spoon warm jus/onions over slices.
- Make-ahead option: Chill whole (unsliced) in juices; next day, slice cold, lay in a pan with defatted jus, cover, and rewarm at 300°F / 150°C until hot.