The Best Fluffy Pancakes recipe you will fall in love with. Full of tips and tricks to help you make the best pancakes.
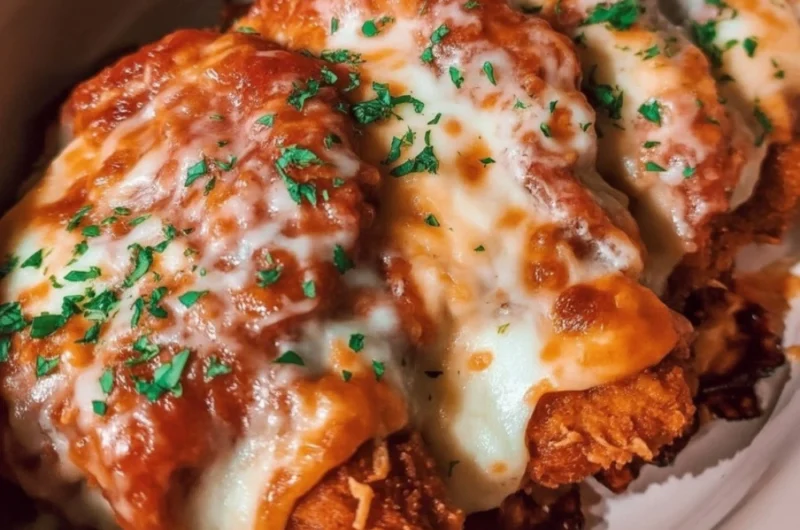
Crispy Chicken Parmesan: Never Soggy, Always Perfect
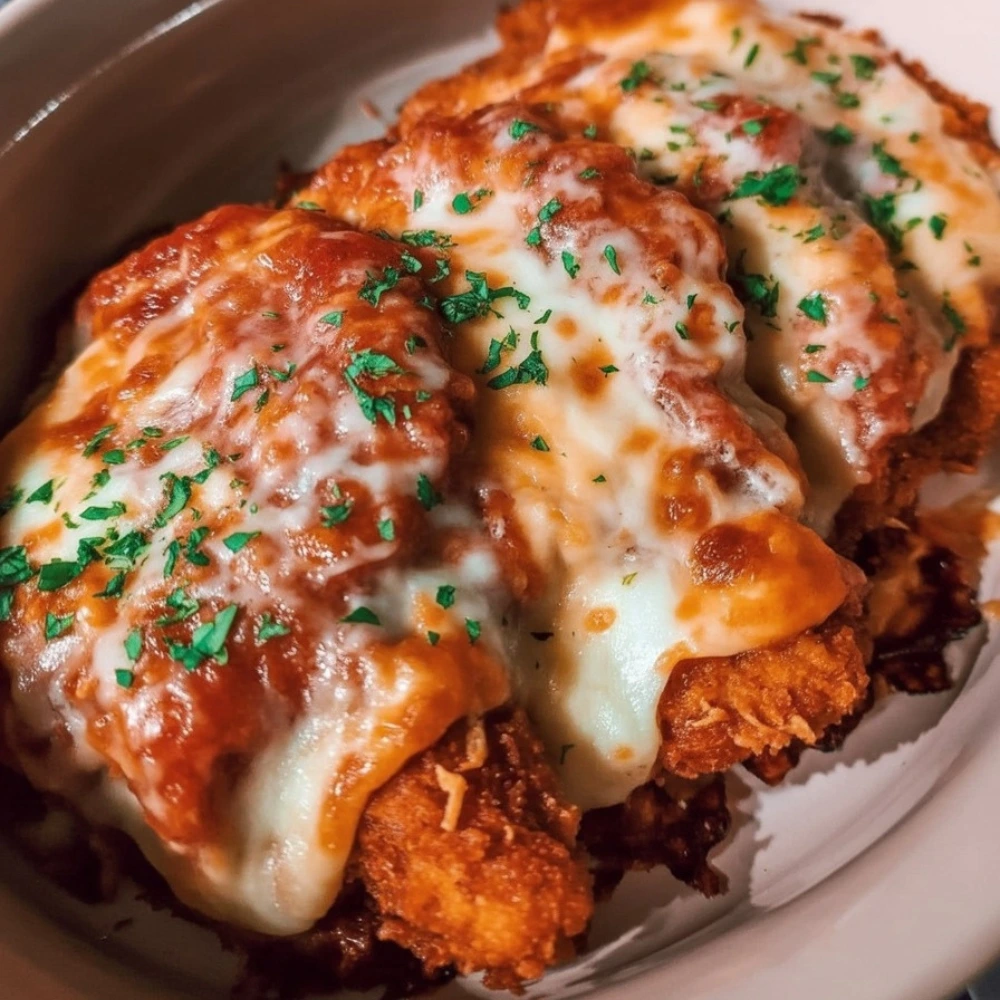
There’s nothing more disappointing than soggy chicken parmesan. You know the feeling—you’ve spent time breading and frying, only to end up with a limp, moisture-soaked disaster that barely resembles the crispy chicken parmesan recipe you had in mind. But what if I told you that achieving restaurant-quality, crispy chicken parmesan at home isn’t just possible – it’s guaranteed with the right technique?
The secret to the ultimate crispy chicken parmesan isn’t just in the breading; it’s in the assembly. Most recipes fail because they don’t understand the science behind moisture protection. Today, I’m sharing the game-changing method that ensures your homemade chicken parmesan stays crispy from the first bite to the last, with a foolproof anti-sog technique that will revolutionize your Italian cooking.
Why This Recipe Guarantees a Crispy Crust
After testing dozens of variations in our kitchen, we’ve cracked the code for crispy chicken parmesan that stays crispy. Here’s exactly why our method works where others fail:
The Double Panko Dredge
- Panko superiority: Unlike regular breadcrumbs, panko creates larger air pockets that maintain structure even when heated
- Double coating technique: The first layer adheres to the egg wash, while the second creates an extra barrier of protection
- Texture science: This method creates a multi-layered defense system against moisture penetration
The Shallow-Fry Secret
- Perfect oil temperature: Maintaining 350°F ensures rapid crust formation without oil absorption
- Pan-frying advantage: Unlike deep frying, shallow frying allows better control and creates superior texture
- Oil selection: Neutral oils with high smoke points (vegetable or canola) prevent burning while achieving golden perfection
The Anti-Sag Assembly Method
This is our killer technique that separates amateur attempts from professional results:
- Chicken base → Cheese barrier → Sauce layer → Final cheese topping
- The initial cheese layer creates a moisture-proof shield
- Steam from the sauce is trapped above the protective cheese layer
- Result: Crispy crust remains intact throughout baking and serving
Ingredients & Smart Substitutions
For the Chicken Cutlets
| Ingredient | Amount | Why It Matters |
|---|---|---|
| Boneless chicken breasts | 4 large (2 lbs) | Even thickness ensures uniform cooking |
| Salt | 2 tsp | Pre-seasoning draws out moisture |
| Black pepper | 1 tsp | Essential flavor foundation |
Pro Insight: Pounding chicken to ¼-inch thickness is the most critical step for even cooking. Uneven pieces create hot spots and soggy areas.
For the Marinara Sauce
Choose your path to sauce perfection:
Quick 20-Minute Homemade Option:
- 2 cans (28 oz each) San Marzano tomatoes, crushed
- 4 cloves garlic, minced
- 2 tbsp olive oil
- 1 tsp dried oregano
- ½ tsp red pepper flakes
- Salt and pepper to taste
Best Store-Bought Recommendations:
- Premium choice: Rao’s Marinara (no sugar added, authentic flavor)
- Budget-friendly: Hunt’s Traditional (reliable consistency)
- Gourmet option: San Marzano DOP-certified sauces
For the Cheese Blend
The perfect cheese combination balances melt, flavor, and texture:
- Low-moisture mozzarella (2 cups, shredded): Superior melting without excess water
- Parmigiano-Reggiano (1 cup, freshly grated): Nutty complexity and browning capability
- Optional enhancement: ¼ cup Romano for extra sharpness
The Ultimate Chicken Parmesan: Step-by-Step Instructions
Phase 1: Making the Quick Marinara
- Heat olive oil in a large saucepan over medium heat
- Add minced garlic, cook until fragrant (30 seconds)
- Add crushed tomatoes, oregano, red pepper flakes
- Simmer 15-20 minutes until slightly thickened
- Season with salt and pepper to taste
Phase 2: Preparing the Bread Station
[Photo: Three-station setup with flour, eggs, and panko]
Set up your assembly line:
- Station 1: All-purpose flour (1 cup) seasoned with salt and pepper
- Station 2: Beaten eggs (3 large) with 2 tbsp water
- Station 3: Panko breadcrumbs (2 cups) mixed with ½ cup grated Parmesan
Pro-Tip: The “Dry Hand, Wet Hand” Method
“Keep your left hand for dry ingredients (flour, panko) and right hand for wet (egg wash). This prevents breading buildup on your fingers and ensures cleaner coating.” – Test Kitchen Tip
Phase 3: Frying for a Perfect Golden Crust
- Heat ½ inch of oil to exactly 350°F in a large skillet
- Dredge chicken: flour → egg → panko → egg → panko (double coating)
- Fry 3-4 minutes per side until deep golden brown
- Critical step: Transfer to wire rack, not paper towels
Phase 4: The Anti-Sog Assembly & Final Bake
- Preheat oven to 425°F
- Spread thin layer of sauce in baking dish
- Place fried chicken on sauce
- Moisture barrier: Top each piece with mozzarella
- Add remaining sauce over cheese
- Final Parmesan topping
- Bake 15-20 minutes until cheese bubbles and browns

Pro-Tips from Our Test Kitchen
Breading Success Secrets
- Never press hard: Gentle patting preserves the airy panko structure
- Rest period: Let breaded chicken sit 10 minutes before frying for better adhesion
- Temperature consistency: Use a thermometer – oil that’s too cool creates soggy coating
Frying Perfection
- Wire rack method: Prevents steam accumulation on the bottom
- Batch cooking: Don’t overcrowd the pan – fry in batches for even browning
- Oil maintenance: Strain oil between batches to remove burnt bits
Assembly Excellence
| Layer Order | Purpose | Pro Tip |
|---|---|---|
| Sauce (thin layer) | Prevents sticking | Just enough to coat the pan |
| Fried chicken | Main protein | Place immediately after frying |
| First cheese layer | Moisture barrier | Press gently to adhere |
| Remaining sauce | Flavor and moisture | Don’t completely cover chicken |
| Final cheese | Browning and flavor | Mix mozzarella and Parmesan |
Serving, Storing, and Reheating
Elevated Serving Suggestions
Move beyond basic pasta with these inspired pairings:
- Fresh arugula salad with lemon vinaigrette cuts through richness
- Roasted broccoli rabe with garlic adds bitter complexity
- Creamy polenta creates a luxurious Italian restaurant experience
- Garlic herb pasta (angel hair or linguine) for traditional comfort
Storage & Reheating Mastery
Refrigerator storage: Up to 3 days in airtight containers
Crispy reheating method:
- Oven method (preferred): 375°F for 10-12 minutes on wire rack
- Air fryer method: 350°F for 5-7 minutes, checking frequently
- Avoid microwaving: Steam destroys the carefully crafted crispy texture
Frequently Asked Questions (FAQ)
Can I make this in an air fryer?
Yes! Air fryer chicken parmesan modification:
- Preheat air fryer to 400°F
- Cook breaded chicken 12-15 minutes, flipping halfway
- Add cheese and sauce in final 3 minutes
- Expect slightly less browning but excellent crispiness
Can I bake it instead of frying?
Healthier baked version (with realistic expectations):
- Coat baking sheet with cooking spray
- Bake at 425°F for 20-25 minutes
- Honesty check: You’ll get 70% of the crispiness of fried version
- Perfect for dietary restrictions, still delicious
Why did my breading fall off?
Common troubleshooting:
- Wet chicken: Pat completely dry before breading
- Skipped flour step: Flour helps egg adhere
- Oil temperature: Too low causes breading to separate
- Improper handling: Use gentle touch when turning
How do I prevent soggy leftovers?
Leftover success strategy:
- Store sauce separately when possible
- Reheat on wire rack in oven
- Add fresh cheese if desired for renewed richness
Ready to create the crispiest chicken parmesan of your life? This foolproof method combines traditional Italian techniques with modern food science for guaranteed success. Save this recipe, share it with fellow food lovers, and prepare for the most satisfying crunch you’ve ever experienced in homemade chicken parmesan.
The Ultimate Crispy Chicken Parmesan: Never Soggy, Always Perfect
Course: DinnerCuisine: Italian, AmericanServings
4
servingsPrep time
20
minutesCooking time
25
minutesCalories
240
kcalIngredients
4 boneless, skinless chicken breasts
Salt and pepper, to taste
1 cup all-purpose flour
2 large eggs, beaten
1 cup breadcrumbs (preferably Italian style)
1 cup grated Parmesan cheese
2 cups marinara sauce
1 ½ cups shredded mozzarella cheese
2 tbsp olive oil
Fresh basil or parsley, for garnish (optional)
Directions
- Preheat oven to 400°F (200°C).
- Season chicken breasts with salt and pepper.
- Dredge each chicken breast in flour, then dip in beaten eggs, and coat with a mix of breadcrumbs and half of the grated Parmesan.
- Heat olive oil in a large skillet over medium-high heat. Brown chicken on both sides (about 2–3 minutes per side).
- Place browned chicken breasts in a baking dish. Spoon marinara sauce over each piece.
- Top each with mozzarella cheese and remaining Parmesan.
- Bake for about 15–20 minutes, or until chicken reaches an internal temperature of 165°F (74°C) and cheese is bubbly and golden.
- Garnish with fresh basil or parsley before serving.