The Best Fluffy Pancakes recipe you will fall in love with. Full of tips and tricks to help you make the best pancakes.
How to Make Authentic Smothered Chicken (That Actually Stays Crispy)
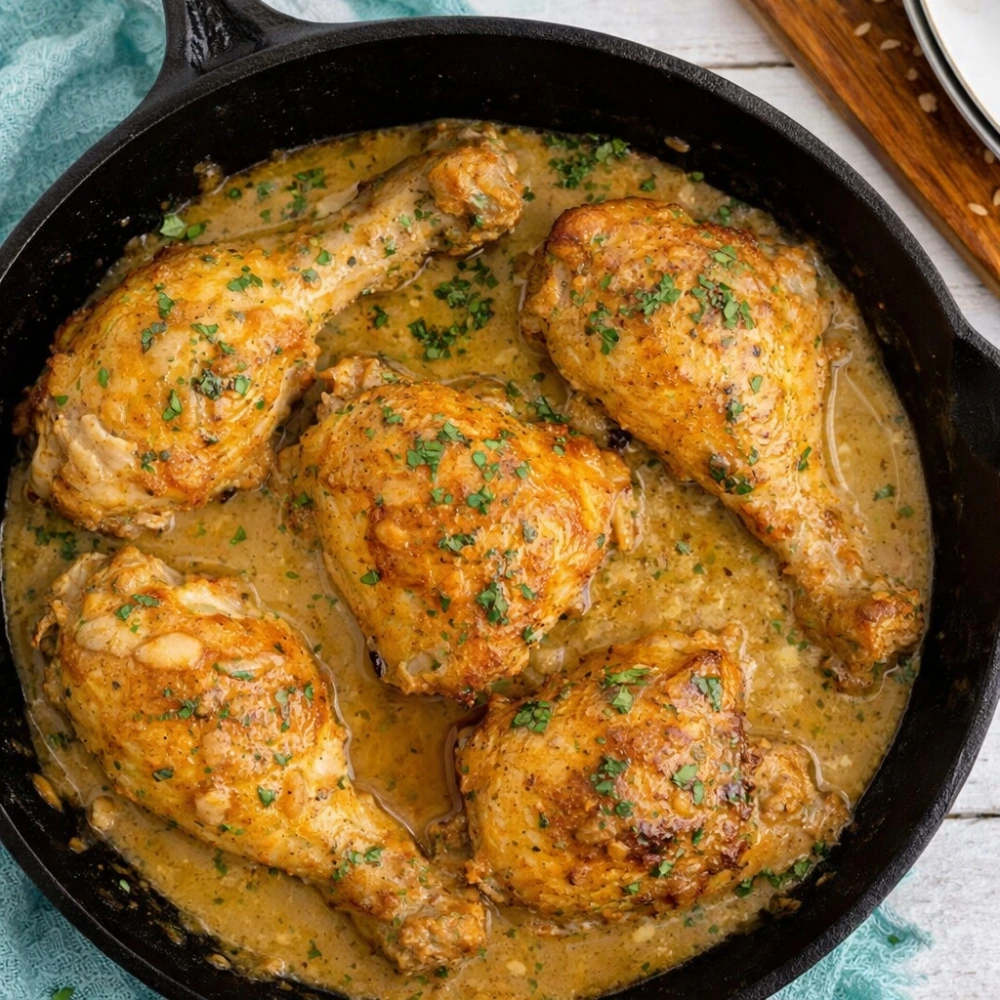
There’s something deeply comforting about Southern smothered chicken with onion gravy—the kind of dish that makes you slow down and savor every bite. But here’s the problem most home cooks face: soggy skin. You follow a recipe promising tender, flavorful chicken, only to end up with limp, steamed skin that’s lost all its texture. The culprit? Traditional smothering techniques that completely submerge the chicken, sacrificing that golden, crispy exterior we all crave.
This isn’t your grandmother’s approximation. This is the science-backed method for achieving authentic smothered chicken that delivers both a rich, velvety onion gravy and chicken with actual textural contrast. Whether you’re cooking in a cast iron skillet or adapting the recipe for dietary needs, this guide will walk you through the exact technique that changes everything.
The Ingredient Matrix: What You Need and Why It Matters
The Chicken: Making the Right Choice
Bone-in, skin-on chicken thighs are the gold standard for smothered chicken. The higher fat content keeps the meat moist during the extended cooking process, and the bones add flavor to your gravy.
If using chicken breasts: Reduce cook time by 8 minutes to prevent dryness. Breasts have less connective tissue and will toughen if overcooked.
The Flavor Base: The Holy Trinity
Influenced by Cajun and Creole cooking traditions, the classic combination includes:
- Onions: 2 large, sliced thin for maximum surface area and sweetness
- Celery: 2 stalks, chopped (adds aromatic depth)
- Bell peppers: 1 green or red (optional, but traditional)
The Gravy Components
- Fat: Bacon grease (2 tablespoons) for authentic Southern flavor, or butter/oil
- Flour: ¼ cup all-purpose for the roux (see gluten-free alternatives below)
- Liquid: 2 cups chicken stock (richer than broth) or a stock-cream combination
- Seasonings: Poultry seasoning, garlic powder, black pepper, salt, paprika
The Roux: Your Thickening Agent
The roux is where magic happens. This mixture of fat and flour, cooked to a peanut butter color, provides both thickening power and a subtle nutty flavor that elevates your gravy from good to unforgettable.
Step-by-Step: The Crispy Skin Method
Step 1: The Sear (8-10 minutes)
Heat your cast iron skillet or heavy-bottomed pan over medium-high heat. Season chicken generously with salt, pepper, and poultry seasoning. Place skin-side down and resist the urge to move it. You’re looking for a deep golden-brown color with crispy edges.
Checkpoint: The chicken should release easily from the pan when properly seared. If it’s sticking, it’s not ready.
Step 2: The Roux (3-5 minutes)
Remove chicken and set aside. In the same pan with the rendered fat, add onions and cook until softened (about 5 minutes). Push onions to the side, add flour to the fat, and whisk constantly. Do not burn the flour—you want a peanut butter color, not chocolate.
Checkpoint: The roux should smell nutty and look like smooth peanut butter when ready.
Step 3: The Gravy Build (5 minutes)
Slowly add chicken stock while whisking continuously. Scrape up all those brown bits from the bottom of the pan—this fond is packed with flavor. Add celery, garlic, and any remaining seasonings. The gravy should coat the back of a spoon.
Step 4: The Braise (20-25 minutes)
Return chicken to the pan, skin-side UP, nestling it into the gravy without submerging the top. Cover partially and reduce heat to low. Let it simmer gently, allowing the meat to absorb flavors while the skin stays crispy.
Final Checkpoint: Internal temperature should reach 165°F, and the meat should be tender but not falling apart.
Troubleshooting Your Smothered Chicken
| Problem | The Cause | The Fix |
|---|---|---|
| Gravy is too thin | Not enough flour or too much broth | Simmer 5 mins longer or add cornstarch slurry |
| Gravy is lumpy | Liquid added too fast | Whisk cold liquid into hot roux slowly |
| Chicken is tough | Cooked at too high heat | Lower heat and cover; let braise gently |
| Skin is soggy | Chicken fully submerged | Keep skin exposed; increase initial sear time |
| Gravy tastes flat | Didn’t scrape the fond | Always deglaze pan thoroughly |

Dietary Adaptations: Customize Your Smothered Chicken
Gluten-Free Smothered Chicken
Replace all-purpose flour with 1:1 gluten-free flour blend or use 2 tablespoons of cornstarch mixed with cold water. Add the cornstarch slurry after your vegetables are cooked, then proceed with adding stock. The result is equally rich and glossy.
Dairy-Free Version
Skip the heavy cream many recipes call for and use full-fat coconut milk instead. It adds richness without dairy, with a subtle sweetness that complements the savory gravy. Alternatively, simply use extra chicken stock for a lighter, more traditional approach.
Keto-Friendly Adaptation
Eliminate flour entirely and use xanthan gum as your thickener (½ teaspoon mixed into cold stock before adding). Serve over cauliflower rice or alongside roasted low-carb vegetables instead of traditional rice or mashed potatoes.
Pro Tips for Next-Level Results
Temperature matters: Let your chicken sit at room temperature for 15 minutes before cooking. Cold chicken hitting a hot pan creates uneven cooking and prevents proper searing.
Don’t crowd the pan: Work in batches if necessary. Overcrowding drops the pan temperature and creates steam instead of the sear you need.
Taste and adjust: After the gravy comes together, taste it. Add a splash of apple cider vinegar or lemon juice if it tastes flat—acid brightens the entire dish.
The resting period: Let your finished smothered chicken rest for 5 minutes before serving. This allows the juices to redistribute throughout the meat.
Smothered chicken isn’t complicated—it’s simply about understanding the fundamentals. Master the sear, respect the braise, and keep that skin exposed. Whether you’re cooking traditional Southern smothered chicken with onion gravy or adapting it for modern dietary needs, this technique delivers consistent, restaurant-quality results every time. The combination of crispy skin and rich, oniony gravy isn’t just nostalgic comfort food—it’s proof that when you understand the science, you can have it all.

How to Make Authentic Smothered Chicken (That Actually Stays Crispy)
Course: DinnerCuisine: AmericanServings
4
servingsPrep time
15
minutesCooking time
35
minutesCalories
520
kcalIngredients
6 bone-in, skin-on chicken thighs (about 1.8 lb / 800 g)
1 tsp kosher salt
1/2 tsp black pepper
1/2 tsp paprika (smoked or sweet)
1/2 tsp garlic powder
2 Tbsp all-purpose flour (for chicken)
2 Tbsp olive oil (or vegetable oil)
2 Tbsp unsalted butter
1 large yellow onion, thinly sliced
2 cloves garlic, minced
2 Tbsp all-purpose flour (for gravy)
2 cups low-sodium chicken broth (or stock)
1/2 cup whole milk or half-and-half
1 tsp Dijon mustard (optional, for depth)
1/2 tsp dried thyme (or 1 tsp fresh)
1 bay leaf (optional)
1 Tbsp chopped parsley (garnish)
Optional add-ins: 1 cup sliced mushrooms; a pinch of cayenne for heat
Directions
- Season & dredge: Pat chicken dry. Mix salt, pepper, paprika, and garlic powder; season chicken. Lightly dredge both sides in 2 Tbsp flour; shake off excess.
- Sear: Heat oil in a large skillet over medium-high. Place chicken skin-side down; sear 4–5 min until deeply golden. Flip and sear 3–4 min. Transfer to a plate (it won’t be cooked through).
- Aromatics: Lower heat to medium. Add butter; then onions (and mushrooms if using). Sauté 5–7 min until soft and lightly browned. Add garlic; cook 30 sec.
- Roux: Sprinkle in 2 Tbsp flour; stir 1 min to form a paste.
- Build gravy: Slowly whisk in broth, then milk/half-and-half, Dijon, thyme, and bay leaf. Simmer 1–2 min until slightly thickened. Taste and adjust salt/pepper.
- Smother: Nestle chicken back into skillet, skin-side up. Reduce to a gentle simmer, cover, and cook 15–18 min (internal temp 74°C / 165°F).
- Finish: Uncover and simmer 2–3 min to thicken as desired. Discard bay leaf. Spoon gravy over chicken, scatter parsley, and serve.
- Serve with: Mashed potatoes, rice, or buttered egg noodles; green beans or a crisp salad.