The Best Fluffy Pancakes recipe you will fall in love with. Full of tips and tricks to help you make the best pancakes.
Perfect Mini Pumpkin Pies: Classic, Healthier, & Gourmet Variations

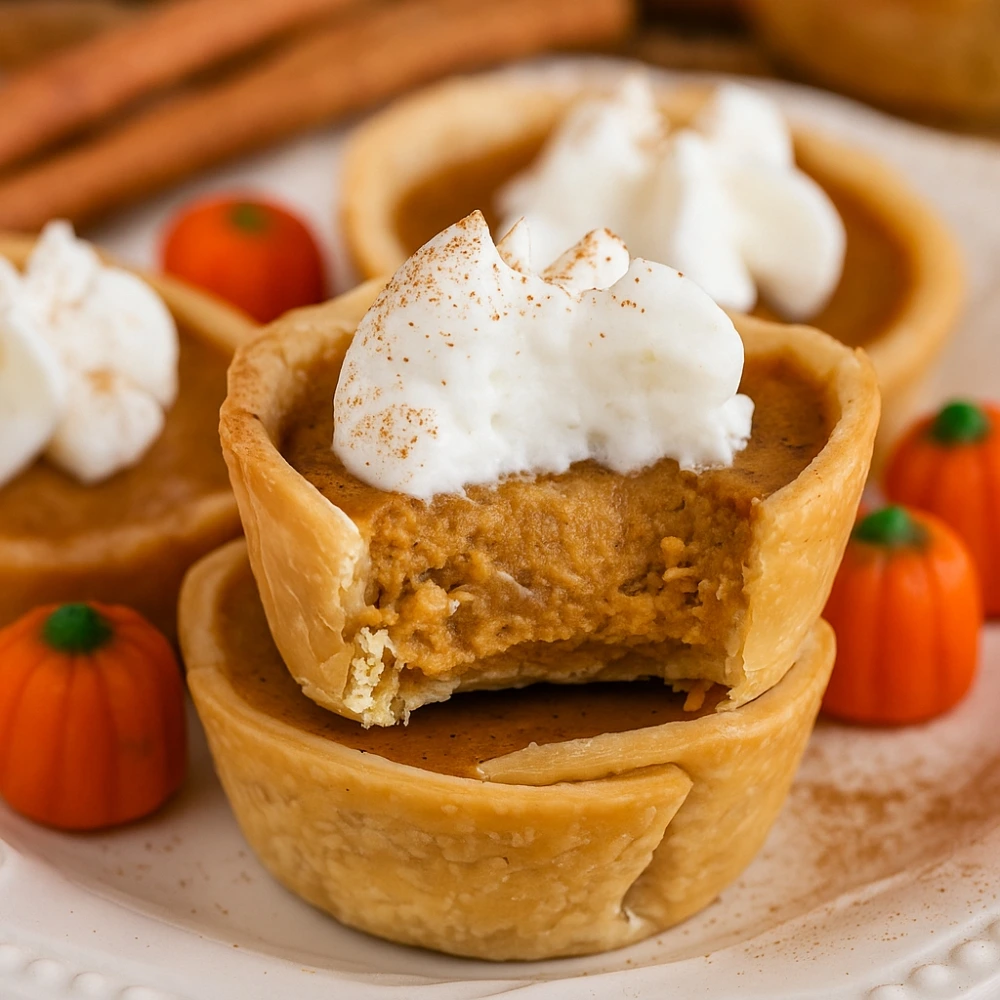
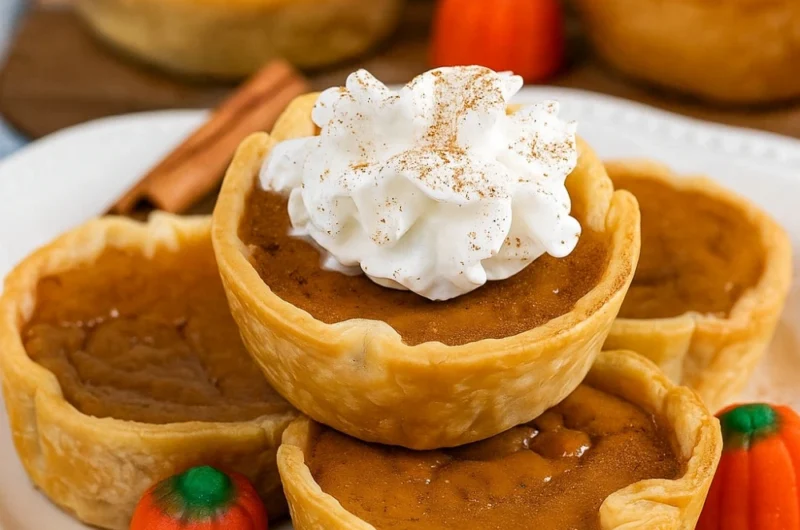
There’s something magical about the first bite of a perfectly spiced mini pumpkin pie—the buttery, flaky crust giving way to silky-smooth pumpkin custard infused with cinnamon, nutmeg, and warming autumn spices. These individual-sized treats capture all the nostalgic comfort of traditional pumpkin pie while offering perfect portion control and an adorable presentation that guests can’t resist.
Whether you’re planning your Thanksgiving dessert table, looking for easy fall desserts, or simply craving the quintessential flavors of the season, this comprehensive guide delivers everything you need to master mini pumpkin pies. I’ll walk you through the classic recipe, troubleshoot common pitfalls, and share gourmet variations that’ll make your pies stand out—from gluten-free options to decadent topping ideas.
Why Mini Pumpkin Pies Are Better Than Traditional
Before we dive into the recipe, let’s talk about why these individual pumpkin pies have become such a sensation:
- Perfect Portions: No messy slicing or serving disputes
- Faster Baking Time: 20-25 minutes versus 50+ minutes for full pies
- Customization: Different toppings for different tastes
- Make-Ahead Friendly: Easier to store and transport
- Visual Appeal: They simply look adorable on any dessert spread
The Ultimate Classic Mini Pumpkin Pie Recipe
Ingredients
For the Crust:
- 1¼ cups all-purpose flour
- ½ tablespoon granulated sugar
- ½ teaspoon salt
- ½ cup (1 stick) cold unsalted butter, cubed
- 3-4 tablespoons ice water
For the Pumpkin Filling:
- 1 cup pumpkin puree (pure pumpkin, not pie filling)
- ⅓ cup packed light brown sugar
- 1 large egg
- ½ cup heavy cream
- 1 teaspoon vanilla extract
- ¾ teaspoon ground cinnamon
- ¼ teaspoon ground ginger
- ⅛ teaspoon ground nutmeg
- ⅛ teaspoon ground cloves
- ¼ teaspoon salt
Yield: 12 mini pies | Prep Time: 25 minutes | Cook Time: 22 minutes | Total Time: 47 minutes (plus chilling)
Step-by-Step Instructions
Making the Perfect Crust
- Prepare the dough: In a large bowl, whisk together flour, sugar, and salt. Add cold butter cubes and use a pastry cutter or your fingertips to work the butter into the flour until the mixture resembles coarse crumbs with pea-sized pieces of butter remaining. Why This Step Matters: Those visible butter pieces create steam pockets during baking, resulting in that coveted flaky texture.
- Add water gradually: Sprinkle 3 tablespoons of ice water over the mixture and stir with a fork. Add more water, one teaspoon at a time, until the dough just comes together when pressed.
- Chill the dough: Shape into a disk, wrap in plastic, and refrigerate for at least 30 minutes (or up to 2 days). Why This Step Matters: Chilling relaxes the gluten and keeps the butter cold, preventing shrinkage and ensuring a tender, flaky crust.
Forming the Mini Pie Shells
- Preheat and prep: Preheat your oven to 350°F (175°C). Grease a standard 12-cup muffin tin generously.
- Roll and cut: On a lightly floured surface, roll the dough to about ⅛-inch thickness. Use a 4-inch round cutter (or a drinking glass) to cut 12 circles.
- Press into muffin cups: Gently press each dough circle into a muffin cup, pressing firmly against the bottom and sides. The dough should come up to the rim. Use a fork to prick the bottom of each crust 2-3 times. Pro Tip: If using mini tart pans instead of a muffin tin, you’ll get even more professional-looking results with defined edges.
Creating the Silky Pumpkin Filling
- Whisk the filling: In a medium bowl, whisk together pumpkin puree, brown sugar, egg, heavy cream, vanilla, and all the spices until completely smooth with no lumps. Why This Step Matters: Thorough whisking incorporates air and ensures even spice distribution for consistent flavor in every bite.
- Fill the shells: Carefully spoon or pour the filling into each crust, filling to about ¾ full (they won’t rise much but you want room for toppings).
Baking to Perfection
- Bake: Place the muffin tin on the center oven rack and bake for 20-25 minutes. The pies are done when the edges are set but the centers still jiggle slightly when gently shaken. Critical Tip: Don’t overbake! The filling will continue to set as it cools. Overbaking leads to cracks and a grainy texture.
- Cool properly: Let the pies cool in the pan for 10 minutes, then carefully remove them to a wire rack. Cool completely before adding toppings or serving.
Healthier & Diet-Friendly Variations
Gluten-Free Mini Pumpkin Pies
Replace the all-purpose flour in the crust with a 1:1 gluten-free baking flour blend. Add 1 teaspoon of xanthan gum if your blend doesn’t include it. The dough may be slightly more delicate, so handle gently and chill for a full hour before rolling.
Key adjustments:
- Use cold butter (or vegan butter for dairy-free)
- Roll between parchment paper to prevent sticking
- Expect a slightly more crumbly but still delicious texture
Dairy-Free Variation
Substitute the heavy cream with full-fat coconut milk (shake the can well before measuring). The result is incredibly creamy with a subtle coconut undertone that complements the pumpkin beautifully.
Naturally Sweetened Option
Replace brown sugar with ⅓ cup pure maple syrup or ¼ cup date paste. These natural sweeteners add complexity and keep the pies moist. Note that maple syrup will make the filling slightly thinner, so you may want to add 1 tablespoon of cornstarch to the mixture.
Gourmet Topping Variations
Transform your mini pumpkin pies from classic to extraordinary with these elevated toppings:
Spiced Whipped Cream
Whip 1 cup heavy cream with 2 tablespoons powdered sugar, ½ teaspoon vanilla, and a pinch each of cardamom and ground ginger. Pipe or dollop onto cooled pies.
Salted Caramel Drizzle
Warm ¼ cup store-bought or homemade caramel sauce and drizzle over the pies. Finish with a sprinkle of flaky sea salt for that sweet-salty magic.
Pecan Streusel Topping
Combine ¼ cup flour, ¼ cup brown sugar, 3 tablespoons melted butter, and ½ cup chopped pecans. Sprinkle over filling before baking for a crunchy contrast.
Dark Chocolate Swirl
Melt 2 ounces dark chocolate and drizzle in a decorative pattern. The bittersweet chocolate cuts through the sweetness perfectly.
Candied Pumpkin Seed Brittle
Toast ¼ cup pumpkin seeds with 2 tablespoons sugar in a pan until caramelized. Cool on parchment and break into pieces to garnish.
Expert Tips & Troubleshooting
Common Problems & Solutions
| Problem | Cause | Solution |
|---|---|---|
| Crusts shrinking during baking | Dough wasn’t chilled enough or stretched too much | Always chill dough 30+ minutes; press gently without stretching |
| Filling cracking | Overbaked or temperature too high | Bake just until edges set; center should jiggle slightly |
| Pies not setting | Underbaked or too much liquid | Bake full 20-25 minutes; ensure accurate measuring |
| Soggy bottom crust | Filling too wet or crust not blind-baked | Use pure pumpkin puree (not watery); consider blind-baking 5 minutes |
Pro Tips for Perfection
Pumpkin Puree Matters: Always use 100% pure pumpkin puree, not pumpkin pie filling. If your puree seems watery, spread it on paper towels for 10 minutes to absorb excess moisture.
Preventing Overbaking: Set your timer for 20 minutes and check every 2 minutes after. The pies will look slightly underdone but will firm up during cooling.
Tool Upgrades: While muffin tins work great, investing in mini tart pans with removable bottoms creates more professional results and easier removal.
Temperature Control: Use an oven thermometer—many ovens run hot or cold. Pumpkin custard is temperature-sensitive and bakes best at a true 350°F.
Make-Ahead, Storage & Freezing Guide
One of the best features of mini pumpkin pies is their make-ahead friendliness, perfect for holiday meal planning.
Make-Ahead Timeline
- Crust dough: Make up to 3 days ahead; refrigerate wrapped in plastic
- Unbaked assembled pies: Prepare completely, cover, and refrigerate up to 24 hours before baking
- Baked pies: Make up to 2 days ahead; refrigerate covered
Storage Instructions
- Room temperature: Up to 2 hours (for serving)
- Refrigerator: Up to 4 days in an airtight container
- Freezer: Up to 2 months
Freezing Like a Pro
To freeze baked pies:
- Cool completely on a wire rack
- Place in a single layer on a baking sheet and freeze until solid (2 hours)
- Transfer to a freezer bag or container, separated by parchment paper
- Freeze up to 2 months
To thaw and serve:
- Refrigerator method: Thaw overnight in the fridge
- Quick method: Let sit at room temperature for 1-2 hours
- Warm method: Heat in a 300°F oven for 10 minutes for that fresh-baked taste
To freeze unbaked pies: Assemble completely, freeze on a baking sheet, then transfer to freezer bags. Bake from frozen, adding 5-7 minutes to the baking time.
Frequently Asked Questions
Can I use store-bought pie crust? Absolutely! While homemade is wonderful, refrigerated pie dough sheets work great. Roll out, cut circles, and press into muffin cups. You’ll save significant prep time while still getting delicious results.
How long do mini pumpkin pies last? When stored properly in an airtight container in the refrigerator, mini pumpkin pies stay fresh for 3-4 days. The crust may soften slightly, but the flavor remains excellent.
What’s the best way to reheat them? For the best texture, warm in a 300°F oven for 8-10 minutes. Avoid the microwave if possible, as it can make crusts soggy and filling rubbery. If you must microwave, use 50% power in 15-second intervals.
Can I make these dairy-free? Yes! Use coconut milk in place of heavy cream and vegan butter for the crust. The texture and flavor are remarkably close to the traditional version.
Are mini pumpkin pies better warm or cold? This is personal preference! Many prefer them slightly warm (around room temperature) to enhance the spices, while others love them chilled for a firmer, cheesecake-like texture. Try both ways to decide your favorite.
Your Perfect Mini Pumpkin Pies Await
With this comprehensive guide, you now have everything needed to create mini pumpkin pies that rival any bakery. Whether you stick with the classic recipe or experiment with healthier alternatives and gourmet toppings, these individual pumpkin pies are guaranteed to become your go-to fall dessert.
The beauty of this recipe lies in its versatility—make them dairy-free for guests with restrictions, add a pecan streusel for texture lovers, or keep them classically simple. Either way, you’re creating perfectly portioned autumn magic that’ll have everyone asking for your secret.
Ready to bake? Gather your ingredients, and let’s make this fall season unforgettable, one adorable mini pumpkin pie at a time.
Perfect Mini Pumpkin Pies: Classic, Healthier, & Gourmet Variations
Course: cake ideas, DessertsCuisine: AmericanServings
24
Mini Pumpkin PiesCooking time
20
minutesCalories
120
kcalIngredients
2 refrigerated pie crusts (or homemade), thawed
1 cup canned pumpkin purée
1/2 cup granulated sugar
1/4 cup brown sugar, packed
1 large egg
1/3 cup evaporated milk (or half-and-half)
1 tsp vanilla extract
1 tsp ground cinnamon
1/4 tsp ground nutmeg
1/4 tsp ground ginger
1/8 tsp ground clove (optional)
1/4 tsp fine salt
Whipped cream, for topping (optional)
Directions
- Prep pans: Preheat oven to 190°C/375°F. Lightly grease a 24-cup mini muffin pan.
- Cut crusts: Unroll pie crusts and cut 24 rounds (about 2.5 in/6–7 cm). Press gently into mini muffin cups; chill 10 minutes if dough feels warm.
- Make filling: Whisk pumpkin, sugars, egg, evaporated milk, vanilla, spices, and salt until smooth.
- Fill: Spoon about 1 tablespoon filling into each crust (just below the rim).
- Bake: 18–20 minutes, until centers are just set and crust edges are golden.
- Cool: Let rest 10 minutes in pan, then loosen with a thin knife and transfer to a rack to cool completely.
- Serve/Store: Top with whipped cream before serving. Store covered in the fridge up to 3 days, or freeze (without cream) up to 2 months.