The Best Fluffy Pancakes recipe you will fall in love with. Full of tips and tricks to help you make the best pancakes.
Perfect Peppermint Bark: No Separation, No Bloom
We’ve all been there: You bite into a piece of peppermint bark, and the white chocolate layer falls off into your lap. It’s frustrating, embarrassing, and makes you question whether homemade peppermint bark is worth the effort. Unlike other recipes that rely on luck, this guide uses simple chocolate thermodynamics to ensure your layers bond permanently. No fancy thermometer required—just an understanding of chocolate bonding and the critical “tacky phase” that makes all the difference.
The “Cheat Sheet” (Your Quick Reference Guide)
Before we dive deep, here’s your troubleshooting roadmap:
| Problem | The Science | The Fix |
|---|---|---|
| Layers Separating | Thermal shock from different cooling rates | Pour top layer when bottom is tacky, not fully set |
| Streaky, Dull Appearance (Bloom) | Cocoa butter crystals forming incorrectly | Maintain proper tempering temperature (88-90°F for dark) |
| Soft, Won’t Snap | Insufficient cocoa butter or improper crystallization | Use real chocolate (couverture), not candy melts |
| Toppings Falling Off | Applied to fully hardened surface | Press crushed candy gently into warm chocolate |
Ingredients: Why Quality Matters (And What Others Won’t Tell You)
Not all chocolate is created equal, and this is where most peppermint bark recipes fail you from the start.
For the Dark Chocolate Base:
- 12 oz high-quality dark chocolate (60-70% cacao)
- Use couverture chocolate, not compound chocolate or candy melts
For the White Chocolate Layer:
- 12 oz real white chocolate (containing cocoa butter)
- Avoid white candy coating products
For the Topping:
- 6-8 candy canes, crushed
- Optional: flaky sea salt for contrast
The Couverture vs. Compound Debate
Here’s what traditional recipes don’t explain: Couverture chocolate contains at least 31% cocoa butter, which is essential for proper crystallization and that satisfying snap. The higher cocoa butter content creates stable crystal formations that bond layers effectively.
Compound chocolate (often labeled as “candy melts” or “almond bark”) replaces cocoa butter with vegetable oils. While easier to work with, these substitutes don’t create the molecular structure needed for layer adhesion. You’ll end up with chocolate that melts in your hands and separates into distinct layers.
Some recipes suggest adding coconut oil to thin chocolate—this is a shortcut that compromises texture. Real cocoa butter provides superior snap and flavor without the greasy mouthfeel.
The Step-by-Step Method (Optimized for Success)
Step 1: Prepare Your Dark Chocolate Base
Line a 9×13-inch baking sheet with parchment paper. Chop 12 oz of dark chocolate into uniform pieces (about ½-inch chunks) for even melting.
Melt two-thirds of the chocolate using a double boiler or microwave in 30-second intervals, stirring between each. Once melted, remove from heat and stir in the remaining third. This seeding method helps maintain proper crystal structure without a thermometer—the unmelted chocolate “teaches” the melted chocolate how to crystallize correctly.
Pour the dark chocolate onto your prepared pan and spread evenly with an offset spatula. The layer should be about ¼-inch thick.
Step 2: The Critical “Tacky” Phase (This is Where You Win)
Here’s the game-changer that other peppermint bark recipes miss entirely: the tacky phase is your window of opportunity.
After spreading your dark chocolate layer, let it rest at room temperature (68-72°F) for 8-12 minutes. You’re looking for a specific texture—not fully hardened, not liquid, but somewhere in between.
The Touch Test: Gently press your fingertip to the surface. It should:
- Feel slightly sticky
- Show a faint fingerprint that doesn’t fill back in
- Not transfer chocolate to your finger
- Have lost its glossy sheen but not be completely matte
This is the molecular sweet spot. The cocoa butter crystals have begun forming stable networks, but they’re still warm enough (around 70-75°F) to welcome and bond with the incoming white chocolate layer.
Step 3: The White Chocolate Layer
Using the same seeding method, melt your white chocolate. White chocolate is more temperamental than dark—it burns easily and requires lower temperatures (around 86-88°F is ideal).
The Critical Pour: Once your dark chocolate has reached the tacky phase, immediately pour the white chocolate over it. Work quickly but smoothly, spreading from the center outward. The warmth of the white chocolate will create a thermal bond with the semi-set dark chocolate, essentially fusing the layers at a molecular level.
Step 4: The Topping Application
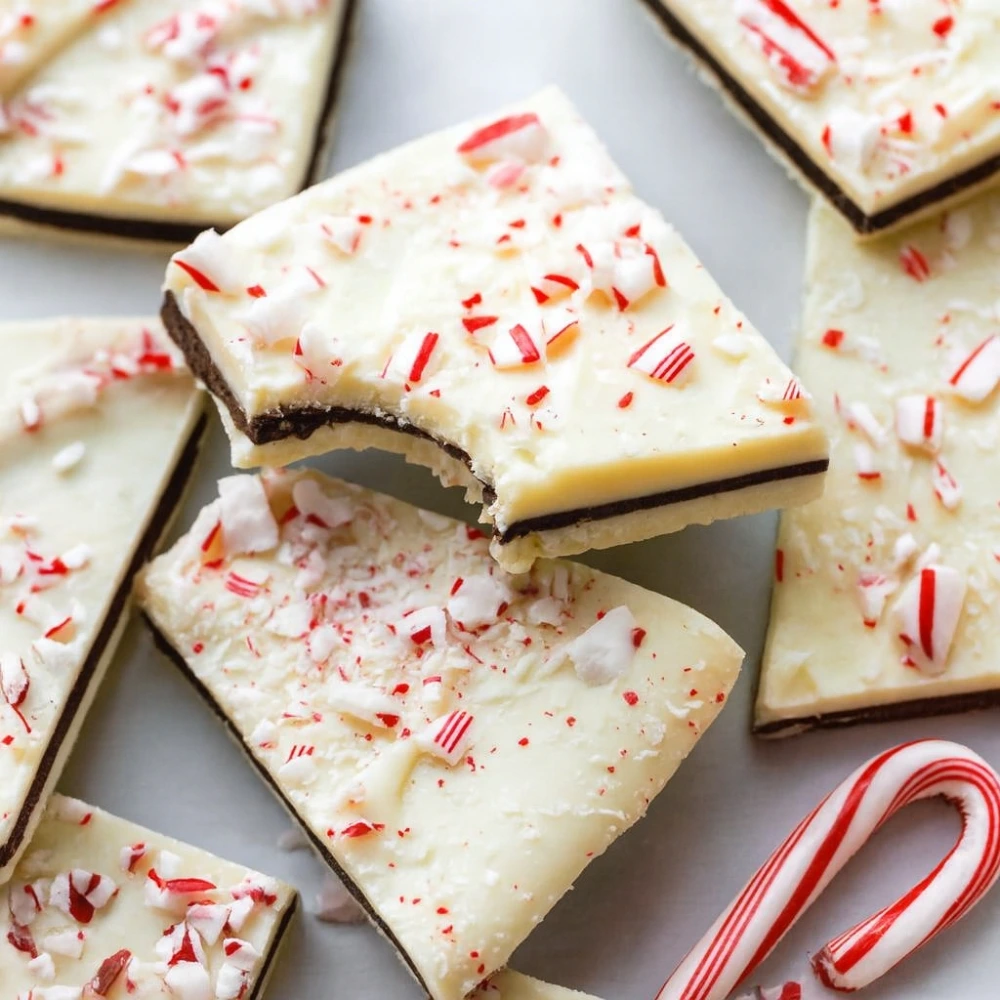
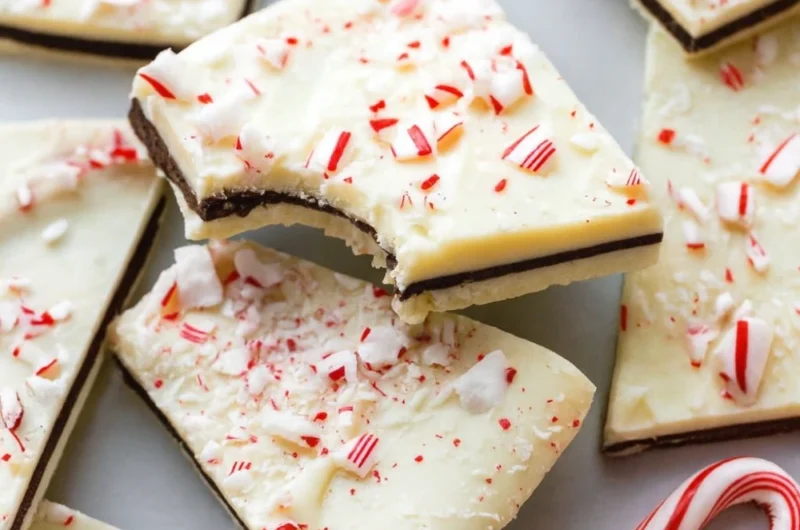
Immediately after spreading the white chocolate, sprinkle your crushed candy canes over the surface. Here’s the key: press them gently with your palm or the back of a spoon. Don’t just sprinkle and hope—physically embedding the peppermint pieces into the warm chocolate ensures they stay attached through cutting and serving.
Allow the entire assembly to set at room temperature for 2-3 hours, or refrigerate for 45 minutes if you’re impatient.
Troubleshooting: Why Your Peppermint Bark Failed (The Expert Solutions)
Why Did My Layers Separate?
Layers separate because the bottom layer was fully set and cold. You must pour the warm white chocolate over the room-temperature (tacky) dark chocolate to create a thermal bond.
Think of it like laminating two pieces of paper—you need heat and pressure to fuse them. When the dark chocolate is completely hardened, you’re essentially trying to glue ice to ice. The molecular structure is locked, unable to integrate with the new layer. But when it’s tacky, the crystal networks are still forming and can interweave with the incoming layer.
Temperature differential is crucial. If your dark chocolate is cold (below 65°F) and your white chocolate is hot (above 95°F), you create thermal shock that causes contraction at different rates—guaranteed separation.
Why Is My Chocolate Streaky or Dull (Bloomed)?
That grayish, streaky appearance is called chocolate bloom, and it happens when cocoa butter crystals form incorrectly or migrate to the surface.
Fat bloom occurs when chocolate experiences temperature fluctuations. If you refrigerate peppermint bark, then bring it to room temperature, then chill it again, the cocoa butter melts and recrystallizes in large, unstable formations that appear as white streaks.
The solution: Maintain consistent temperatures throughout the process. Once set, store your bark in a cool, dry place (60-70°F)—not the refrigerator unless absolutely necessary. If you must refrigerate, let it come to room temperature gradually in its sealed container to prevent condensation.
Can I Make This Vegan or Keto?
Vegan adaptation: Use dairy-free dark chocolate (most are naturally vegan) and vegan white chocolate made with oat milk or coconut milk. The challenge is finding vegan white chocolate with sufficient cocoa butter—many use palm oil instead, which affects texture. Brands like Hu Kitchen or Endangered Species offer better alternatives.
Keto version: Choose sugar-free chocolate sweetened with erythritol or monk fruit. Be aware that sugar alcohols can affect chocolate tempering—you may need to experiment with temperatures slightly. The layer bonding technique remains the same.
My Chocolate Won’t Harden Properly
This indicates improper crystallization. Chocolate contains six different crystal formations, but only Form V creates that perfect snap and glossy finish. If your peppermint bark stays soft or greasy:
- You may have overheated the chocolate (above 120°F destroys crystal structure)
- You used chocolate with vegetable oils instead of pure cocoa butter
- Moisture contaminated your chocolate (even one drop of water causes seizing)
The fix: Start over with fresh, high-quality chocolate, keep all utensils completely dry, and use the seeding method to encourage proper crystallization.
Variations for Modern Tastes
Salted Dark Chocolate Peppermint Bark
Replace half the dark chocolate with 70% cacao for intensity, and finish with flaky Maldon sea salt alongside the peppermint. The salt enhances the chocolate’s complexity and balances sweetness.
Matcha Peppermint Fusion
Add 2 teaspoons of culinary-grade matcha powder to your white chocolate for an earthy twist. The slight bitterness of matcha complements peppermint’s cooling sensation beautifully.
Espresso Peppermint Bark
Fold 1 tablespoon of finely ground espresso into the dark chocolate. The coffee notes amplify chocolate’s depth while creating an adult-friendly flavor profile.
The Science Behind the Snap
Understanding chocolate tempering transforms you from recipe-follower to confident chocolatier. When cocoa butter cools, it can form six different crystal structures. Only Form V crystals (created between 88-91°F for dark chocolate) produce:
- Glossy finish
- Satisfying snap when broken
- Stable storage properties
- Smooth mouthfeel
The seeding method works because the unmelted chocolate chunks contain stable Form V crystals. When stirred into melted chocolate, they act as “templates,” encouraging the liquid cocoa butter to crystallize correctly as it cools.
Storage and Serving Tips
Store your peppermint bark in an airtight container with parchment paper between layers. Properly tempered chocolate will keep at room temperature for up to three weeks without blooming or softening.
Serving temperature matters: Remove from storage 15 minutes before serving. Chocolate flavor compounds are volatile and express themselves best at 65-70°F—cold chocolate actually tastes less chocolatey.
To cut clean pieces, use a sharp chef’s knife warmed under hot water (then dried completely). The warm blade slices through without shattering or creating ragged edges.
Final Thoughts: The Difference Between Good and Great
The distinction between peppermint bark that falls apart and bark that delivers a perfect bite every time comes down to understanding chocolate behavior. It’s not magic or luck—it’s simple food science applied with intention.
That tacky phase is your secret weapon. While other recipes tell you to wait “until set,” you now know the specific window where molecular bonding occurs. This knowledge elevates your homemade peppermint bark from Pinterest fail to professional-quality confection.
The next time someone bites into your creation and both layers stay perfectly intact, you’ll know it wasn’t chance—it was chocolate thermodynamics working exactly as intended.
Perfect Peppermint Bark: No Separation, No Bloom
Course: Desserts, Recipe CollectionsCuisine: AmericanServings
24
servingsPrep time
10
minutesCooking time
5
minutesCalories
150
kcalIngredients
340 g (12 oz) semisweet or dark chocolate, chopped
340 g (12 oz) high-quality white chocolate, chopped
½ tsp peppermint extract (split: ¼ tsp for each chocolate layer)
½ cup (80 g) crushed candy canes or peppermint candies, divided
2 tsp neutral oil or cocoa butter, optional (helps smooth melting; 1 tsp per chocolate)
Pinch of fine salt (optional, for the dark layer)
Directions
- Prep pan: Line a 9×13-inch (23×33 cm) pan or rimmed sheet with parchment, leaving overhang. Lightly tape parchment to keep flat.
- Melt dark chocolate: In a dry, heatproof bowl over barely simmering water (or in short microwave bursts), melt the dark chocolate with 1 tsp oil (if using). Stir until smooth; mix in a pinch of salt and ¼ tsp peppermint extract.
- First layer: Spread into the lined pan to ~3–4 mm thickness. Tap pan to level. Chill 10–15 minutes until just set but not rock-hard.
- Melt white chocolate: Melt white chocolate with 1 tsp oil (if using). Stir until smooth; mix in ¼ tsp peppermint extract.
- Top layer: Pour white chocolate over the set dark layer; spread gently so the warm white doesn’t melt the dark layer. Immediately sprinkle ¾ of the crushed candy evenly on top; press lightly so it adheres.
- Set: Chill 20–25 minutes, until firm but not brittle.
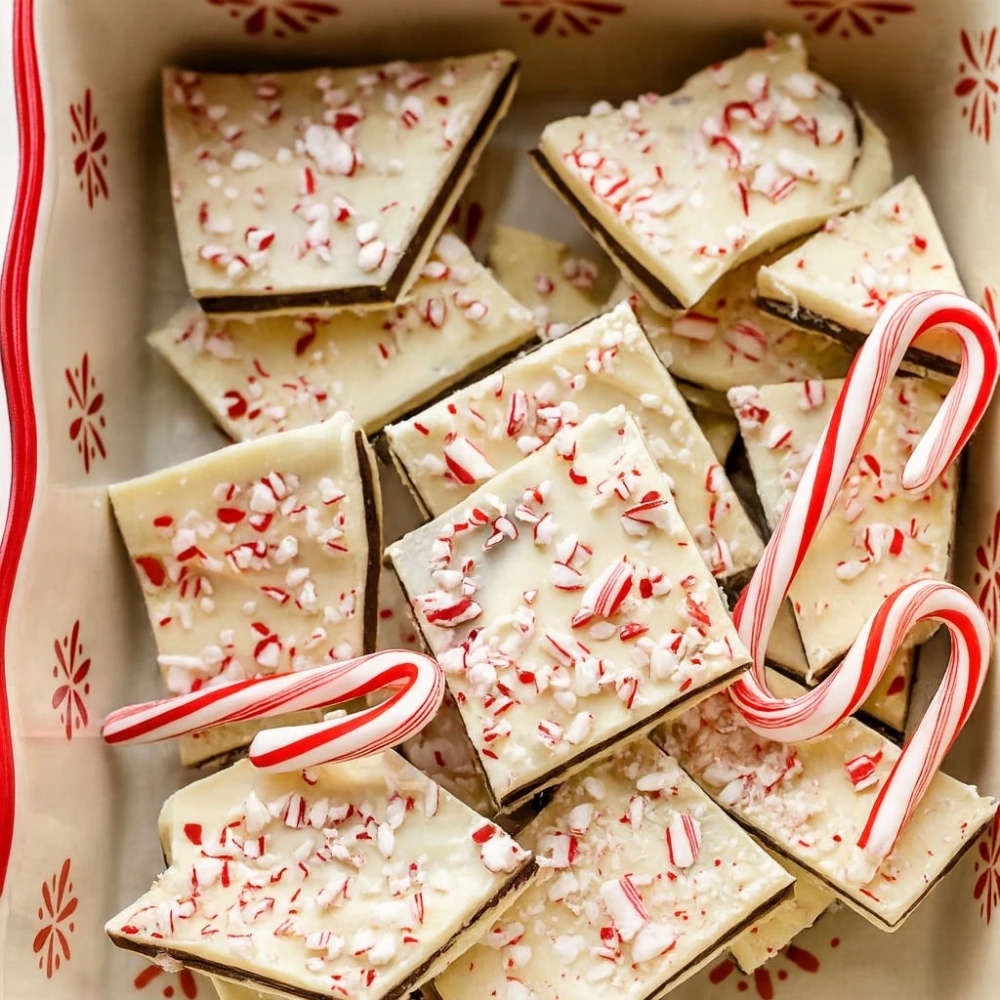
- Finish & portion: Lift bark out using parchment. Sprinkle remaining candy for fresh color, then cut with a warm chef’s knife or break into ~24 pieces.
- Store: Keep in an airtight container at cool room temp up to 2 weeks or refrigerated up to 1 month. For best gloss, avoid frequent temperature swings.