The Best Fluffy Pancakes recipe you will fall in love with. Full of tips and tricks to help you make the best pancakes.
The Last Fruit Cake Recipe You’ll Ever Need
Let’s be honest—most fruit cake is a dry doorstop. You know the one: that dense, crumbly brick that appears every holiday season, studded with neon-colored cherries that belong in a science lab, not your kitchen. It sits on the counter, gets passed around out of obligation, and eventually ends up in the trash or becomes a running joke about its shelf life rivaling that of uranium.
But here’s the truth: fruit cake doesn’t have to be the villain of your holiday table. The problem isn’t the concept—it’s the execution. Traditional recipes rely on weeks of alcohol soaking and vague instructions that leave you with a dessert that’s either bone-dry or oddly boozy. What if I told you there’s a better way? A method backed by culinary science that guarantees a moist fruit cake every single time, without the guesswork or the six-week commitment?
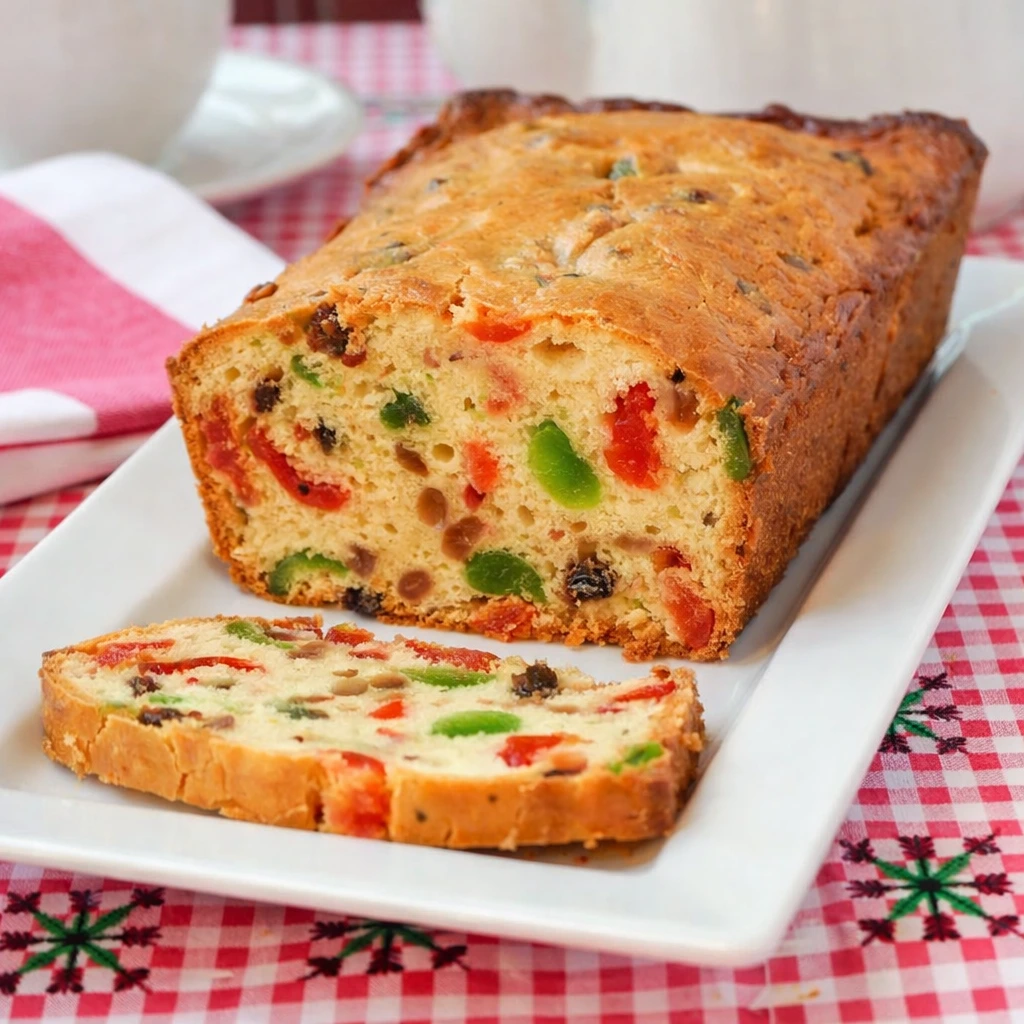
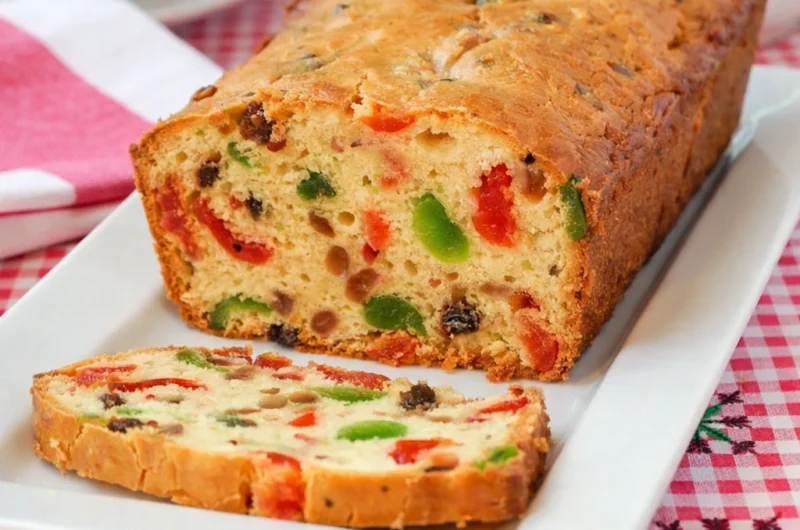
Welcome to the Double-Hydration Method—your ticket to a fruit cake so tender, rich, and flavorful that even the skeptics will come back for seconds. And the best part? No neon cherries in sight. We’re talking golden apricots, tart cranberries, plump figs, and a crumb so perfect it stays moist for up to three months.
The Secret to a Moist Fruit Cake
The secret to a moist fruit cake is the Double-Hydration Method, which involves boiling dried fruits in juice to rehydrate them before baking, followed by a slow-feed of syrup during the cooling process. This ensures the crumb remains tender for up to 3 months.
Unlike traditional methods that require weeks of soaking or the boiled fruit cake approach that can turn too soft, this technique strikes the perfect balance. You’re essentially giving your fruit two chances to absorb moisture: once before it goes into the batter, and once after the cake comes out of the oven. The result? A Christmas cake with a fudgy, almost brownie-like texture that’s worlds away from the dry, crumbly disasters of the past.
Why Traditional Fruit Cake Fails (And How We Fixed It)
Before we dive into the recipe, let’s talk science. The reason most fruit cake recipes produce dry results comes down to three culprits:
- Dehydrated fruit that steals moisture from the batter during baking
- Long baking times that evaporate precious liquid
- No post-bake moisture strategy to keep the cake tender during storage
Traditional recipes tell you to soak fruit in alcohol for weeks, but this only addresses problem #1—and not everyone wants a boozy dessert. The boiled fruit method (popularized by some food bloggers) helps, but it stops there. Our Double-Hydration Method tackles all three issues head-on.
The Double-Hydration Method vs. Traditional Approaches
Not all fruit cake methods are created equal. Here’s how our science-backed approach stacks up:
| Feature | Traditional Method | Boiled Method | Double-Hydration Method |
|---|---|---|---|
| Prep Time | 4-6 Weeks | 20 Minutes | 30 Minutes |
| Texture | Dense/Heavy | Soft/Light | Fudgy & Rich |
| Shelf Life | 1 Year | 2 Weeks | 3 Months |
| Alcohol Required? | Mandatory | None | Optional (Juice or Brandy) |
| Moisture Level | Inconsistent | Good | Guaranteed |
| Beginner-Friendly? | No | Yes | Yes |
As you can see, the Double-Hydration Method gives you the best of both worlds: the long shelf life and rich texture of traditional fruit cake, without the intimidating prep time or mandatory alcohol.
Modern Ingredients: No Neon Cherries Allowed
One of the biggest complaints about fruit cake isn’t just the texture—it’s those artificial glacé cherries that taste like sweet plastic. We’re upgrading to ingredients that actually deserve to be in your dessert:
- Golden Apricots: Sweet, jammy, and gorgeous
- Dried Cranberries: Tart brightness that cuts through richness
- Mission Figs: Deep, caramel-like sweetness
- Medjool Dates: Natural sugar and incredible moisture
- Golden Raisins: Classic, but elegant
- Candied Ginger (optional): A sophisticated spicy kick
These fruits aren’t just better tasting—they’re also packed with natural sugars that help keep your cake moist and add complex flavor layers you simply can’t get from those neon imposters.
The Recipe: Your Step-by-Step Guide to Perfection
Ingredients
For the Fruit Mixture:
- 2 cups mixed dried fruits (apricots, cranberries, figs, dates, raisins)
- 1 cup orange juice (or apple cider)
- ½ cup chopped candied ginger (optional)
- Zest of 1 orange
For the Cake:
- 1½ cups all-purpose flour
- 1 teaspoon baking powder
- ½ teaspoon salt
- 1 teaspoon cinnamon
- ½ teaspoon nutmeg
- ¼ teaspoon ground cloves
- ¾ cup unsalted butter, melted
- ¾ cup brown sugar
- 3 large eggs
- 1 teaspoon vanilla extract
- ½ cup chopped walnuts or pecans
For the Syrup Glaze:
- ¼ cup orange juice (or brandy)
- 2 tablespoons honey
Instructions
Step 1: Hydration Phase One
Combine all dried fruits, orange juice, and zest in a medium saucepan. Bring to a gentle boil, then reduce heat and simmer for 10 minutes until fruits are plump and liquid is mostly absorbed. Let cool to room temperature—this is crucial for preventing the fruit from sinking in your moist fruit cake.
Step 2: Prepare the Batter
Preheat your oven to 300°F (150°C). Line a 9-inch round or loaf pan with parchment paper.
In a large bowl, whisk together flour, baking powder, salt, and spices. In another bowl, whisk melted butter, brown sugar, eggs, and vanilla until smooth. Fold the wet ingredients into the dry ingredients until just combined. Gently fold in the cooled fruit mixture and nuts.
Step 3: The Slow Bake
Pour batter into prepared pan. Bake for 75-90 minutes, or until a toothpick inserted in the center comes out with just a few moist crumbs. The low temperature ensures even baking without drying out the edges.
Step 4: Hydration Phase Two
While the cake bakes, prepare your syrup glaze by warming the juice (or brandy) with honey until combined. As soon as the cake comes out of the oven, poke holes all over the top with a skewer and slowly brush the warm syrup over the surface. Let it soak in completely before removing from the pan.
Tips for Success
✓ Don’t skip the cooling step after boiling fruit—adding hot fruit to batter creates steam pockets
✓ Use melted, not softened butter for that fudgy texture
✓ Invest in an oven thermometer—low, consistent heat is everything
✓ Apply syrup while both cake and syrup are warm for maximum absorption
✓ Wrap cooled cake tightly in plastic wrap, then foil—this is your secret to 3-month shelf life
✓ Make it ahead: This Christmas cake actually improves after 3-5 days as flavors meld

Troubleshooting Your Fruit Cake
Why is my fruit cake crumbling?
Your fruit cake is crumbling because either the fruit wasn’t hydrated enough before baking (stealing moisture from the batter), you overbaked it, or you didn’t apply the post-bake syrup. The Double-Hydration Method prevents this by ensuring moisture at every stage. Also, let the cake cool completely before slicing—cutting while warm causes structural collapse.
Can I make fruit cake without alcohol?
Yes, absolutely! While traditional fruit cake recipes insist on brandy or rum, our method uses fruit juice for both the boiling liquid and syrup glaze with phenomenal results. Orange juice adds brightness, while apple cider brings depth. If you want a slight boozy note without overpowering alcohol, use 2 tablespoons of brandy mixed with juice in the glaze—you’ll get flavor without the sogginess.
How do I store my fruit cake?
Wrap your cooled moist fruit cake tightly in plastic wrap, then aluminum foil. Store at room temperature for up to 2 weeks, or refrigerate for up to 3 months. For the alcohol-free version, refrigeration is recommended after week one. You can also “feed” the cake with additional syrup every week if you want to extend shelf life—just brush on a tablespoon of warm juice or brandy.
Why did my fruits sink to the bottom?
Fruit sinks when it’s too heavy or wet, or when the batter is too thin. After boiling your fruit, make sure excess liquid has been absorbed or drained. Tossing the fruit in a tablespoon of flour before folding into batter also helps. Finally, ensure your fruit has cooled completely—hot fruit will sink through warm batter.
Beyond the Basic: Customization Ideas
The beauty of this fruit cake recipe is its versatility. Once you master the Double-Hydration Method, try these variations:
Tropical Paradise: Replace dried fruits with pineapple, mango, and coconut. Use coconut milk instead of juice.
Chocolate-Studded: Fold in ½ cup dark chocolate chips with the fruit for a modern twist.
Spiced Rum Version: Soak fruits in spiced rum instead of juice, and use rum in the glaze for a traditional boozy cake.
Last-Minute Christmas Cake: Need a dessert today? This recipe goes from start to finish in 2 hours—perfect for Christmas cake for beginners who forgot to start their fruit cake in October.
The Science of Why This Works
The Double-Hydration Method isn’t just a catchy name—it’s rooted in food science. When you boil dried fruit, you’re rehydrating it to approximately 70-80% of its original moisture content. This prevents the fruit from acting like a sponge during baking, stealing precious liquid from your batter.
The second hydration—the syrup glaze applied post-bake—works because the cake’s structure is set but still porous. As it cools, the crumb contracts slightly, creating tiny channels that pull in moisture. This is why timing matters: apply too early and you’ll create a soggy surface; too late and the crumb has sealed itself.
The low oven temperature (300°F vs. the typical 350°F) slows moisture evaporation, giving you time to develop flavor through the Maillard reaction without drying out the crumb. It’s the same principle behind slow-roasted meats—low and slow wins the moisture game.
Final Thoughts: Reclaiming Fruit Cake’s Reputation
It’s time to stop treating fruit cake like a punchline and start celebrating it for what it can be: a sophisticated, make-ahead dessert that improves with time and brings genuine joy to your holiday table. The Double-Hydration Method isn’t complicated—it’s just intentional. By understanding when and how to add moisture, you’re guaranteeing results that would make even your most skeptical guests believers.
This isn’t your grandmother’s dense doorstop or your office party’s regifted obligation. This is a moist fruit cake worth making, worth sharing, and worth remembering. Whether you’re a complete beginner looking for your first Christmas cake success or a seasoned baker ready to upgrade your repertoire, this recipe delivers.
So skip the neon cherries, embrace the golden apricots, and give fruit cake the redemption arc it deserves. Your taste buds—and your holiday guests—will thank you.
Ready to try more holiday baking with guaranteed results? Check out our guides to foolproof gingerbread, no-fail pie crust, and the science of perfect sugar cookies. Happy baking!
The Last Fruit Cake Recipe You’ll Ever Need
Course: DessertCuisine: BritishServings
12
servingsPrep time
25
minutesCooking time
2
hoursCalories
360
kcalIngredients
300 g mixed dried fruit (e.g., raisins, sultanas, chopped dates, currants)
60 g candied orange/lemon peel, chopped
- 120 ml orange juice (or strong black tea; adults may use rum/brandy, optional)
150 g unsalted butter, softened
150 g light brown sugar
3 large eggs, room temp
200 g all-purpose (plain) flour
1 tsp baking powder
½ tsp fine salt
1½ tsp ground mixed spice (or: 1 tsp cinnamon + ¼ tsp nutmeg + ¼ tsp allspice)
1 tsp vanilla extract
Zest of 1 orange
80 g chopped nuts (walnuts/almonds/pecans), optional
2 tbsp milk (as needed for batter consistency)
For finishing (optional):
2 tbsp orange marmalade (to warm and glaze after baking)
2–3 tbsp orange juice for brushing (alcohol-free)
Directions
- Soak fruit (30–60 min ahead): In a bowl, combine dried fruit + candied peel with orange juice (or tea). Stir and let it plump up; drain excess if very wet.
- Prep pan & oven: Heat oven to 150°C / 300°F. Line a 9×5 in (23×13 cm) loaf tin with baking paper; lightly grease.
- Cream: Beat butter and brown sugar until light and fluffy (2–3 min).
- Eggs & flavor: Beat in eggs one at a time. Mix in vanilla and orange zest.
- Dry mix: In another bowl whisk flour, baking powder, salt, and spices.
- Combine: Fold dry mix into the batter. If thick, add 1–2 tbsp milk to get a thick, spoonable batter.
- Add-ins: Fold in soaked fruit (well-drained) and nuts.
- Bake: Spoon into pan, level the top, and bake 1 hr 50 min–2 hr 10 min, until a skewer comes out with a few moist crumbs. If browning early, tent with foil.
- Cool & glaze: Cool 15 min in pan, then lift out. While warm, brush top with warmed marmalade or a little orange juice for shine and moisture.
- Rest: Cool completely. For best texture, wrap and rest 12–24 hours before slicing.