The Best Fluffy Pancakes recipe you will fall in love with. Full of tips and tricks to help you make the best pancakes.
The Ultimate Baker’s Guide to Perfect Marble Cake
Tired of dry marble cakes or muddy, undefined swirls? You’re in the right place. There’s nothing more disappointing than slicing into what you hoped would be a beautiful marble cake recipe only to find dense, flavorless cake with chocolate streaks that look more like mud than elegant swirls.
After testing over a dozen variations—butter vs. oil, different cocoa powders, and multiple marbling techniques—I’ve cracked the code to creating bakery-quality results at home. This guide doesn’t just give you a recipe; it teaches you the ‘why’ behind every step for a moist marble cake with stunning, defined swirls every single time. Whether you’re a beginner baker or looking to perfect your technique, this comprehensive approach will transform your baking game.
Why This is the Last Marble Cake Recipe You’ll Ever Need
This isn’t just another recipe floating around the internet. Here’s what makes this homemade marble cake guide superior:
• Foolproof Results: We break down the science of baking for a guaranteed moist crumb that rivals any bakery • Picture-Perfect Swirls: Learn three distinct marbling techniques, from simple to bakery-style professional methods
• Ingredient Deep Dive: Understand why we use cake flour vs. all-purpose, or Dutch-processed vs. natural cocoa powder • Customizable For You: Includes pan size conversions, high-altitude adjustments, and dietary modifications • Troubleshooting Mastery: Comprehensive FAQ section addressing every possible baking mishap • Professional Tips: Insider secrets that elevate your cake from good to exceptional
The Science of a Perfect Marble Cake: Key Ingredients
Understanding your ingredients is the foundation of baking success. Each component plays a specific role in creating that perfect tender crumb and beautiful marbled appearance.
For the Vanilla Batter:
Cake Flour (2¼ cups): The star ingredient for tenderness. Cake flour contains 6-8% protein compared to all-purpose flour’s 10-12%. This lower protein content means less gluten development, resulting in a more delicate, fine crumb structure that melts in your mouth.
Unsalted Butter, Room Temperature (½ cup): Critical for both flavor and texture. When properly creamed with sugar, butter creates tiny air pockets that give your cake its light, fluffy structure. Room temperature butter (around 65-68°F) creams most effectively.
Buttermilk (¾ cup): The secret to incredible tenderness. The acid in buttermilk tenderizes gluten strands and reacts with baking soda for extra lift. DIY Substitute: Add 1 tablespoon white vinegar or lemon juice to ¾ cup regular milk, let sit 5 minutes.
Large Eggs (3): Provide structure, moisture, and help emulsify the batter for a smooth texture.
Granulated Sugar (1½ cups): Not just for sweetness—sugar tenderizes by interfering with gluten formation and helps retain moisture.
For the Chocolate Batter:
Dutch-Processed Cocoa Powder (¼ cup): This is crucial for achieving deep chocolate flavor and color. Dutch-processed cocoa has been treated with alkali to neutralize its natural acidity, resulting in a darker color and smoother, less bitter taste compared to natural cocoa powder. This lower acidity works perfectly with our vanilla cake batter base.
| Ingredient | Purpose | Pro Tip |
|---|---|---|
| Cake Flour | Tender crumb | Spoon and level—don’t pack |
| Room Temp Butter | Aeration & flavor | Test with finger—should give slightly |
| Buttermilk | Tenderness & tang | Bring to room temp for best mixing |
| Dutch Cocoa | Rich chocolate flavor | Sift to prevent lumps |
How to Make Perfect Marble Cake (Step-by-Step Photos)
Follow these detailed steps for guaranteed marble cake success:
- Prep Your Kitchen: Preheat oven to 350°F (175°C). Grease and flour a 9×13-inch pan or two 9-inch round pans. Pro tip: Use cocoa powder to dust chocolate cakes for better color.
- Cream Butter and Sugar: Beat room temperature butter and sugar for a full 5 minutes until light and fluffy. This step is critical for a light texture—don’t rush it. The mixture should nearly double in volume.
- Add Eggs One at a Time: Beat in eggs individually, ensuring each is fully incorporated before adding the next. Scrape bowl sides frequently.
- Prepare Dry Ingredients: In a separate bowl, whisk together cake flour, baking powder, baking soda, and salt. This ensures even distribution.
- Alternate Wet and Dry: Add the dry and wet ingredients alternately, beginning and ending with the dry ingredients. Mix just until combined to prevent over-developing the gluten.
- Create Chocolate Batter: Remove half the batter (about 2 cups) to another bowl. Gently fold the cocoa mixture into this portion. Be careful not to deflate the air you incorporated during creaming.
- Layer the Batters: Dollop alternating spoonfuls of vanilla and chocolate batter into your prepared pan. Aim for an even distribution across the surface.
Baker’s Secret: The key to beautiful marbling is restraint. Less is more when it comes to swirling—over-mixing creates muddy results.
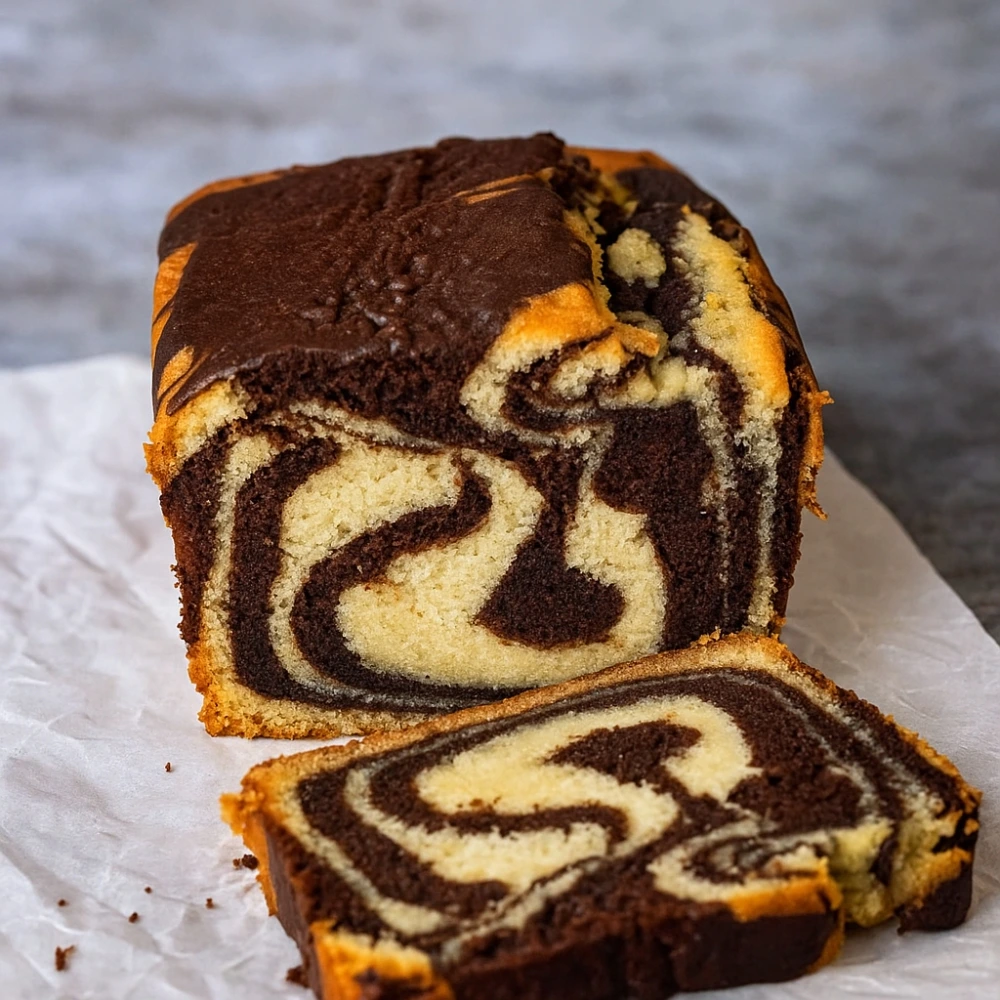
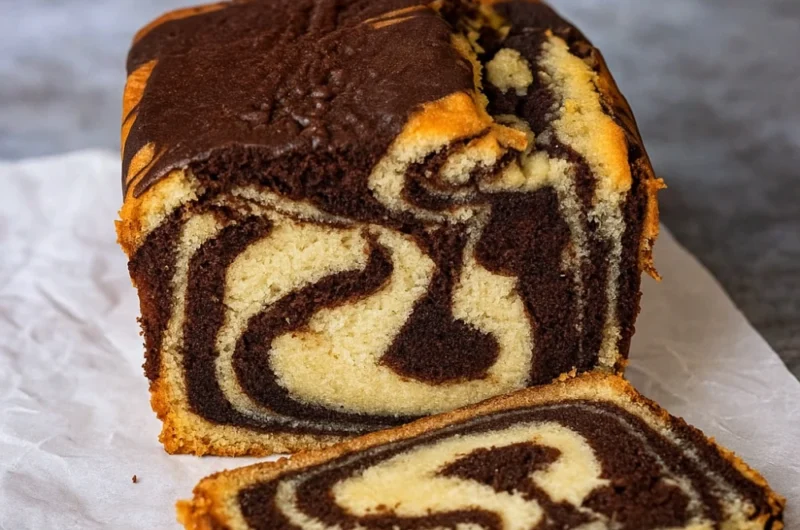
The Art of the Marble: 3 Swirling Techniques
Master these three marbling techniques for different visual effects:
Technique 1: The Classic Zig-Zag (Beginner-friendly)
Perfect for first-time marble cake bakers. Using a knife, draw parallel lines in one direction, then perpendicular lines in the opposite direction. This creates a classic checkerboard marble effect with clean, defined lines.
Technique 2: The Checkerboard Drop (For distinct layers)
Drop alternating colors in a checkerboard pattern, then use a toothpick to connect the centers of each square. This technique creates bold, geometric patterns that photograph beautifully.
Technique 3: The Bakery Swirl (Advanced, using a skewer)
For professional-looking results, use a wooden skewer to create large, sweeping curves through the batter. Start from one corner and work in gentle S-curves across the entire surface. This mimics high-end bakery techniques.
Video Tip: Practice your swirling technique in a practice pan with two different colored batters (you can use food coloring in plain batter) before attempting with your final cake.

The Baker’s Troubleshooting & FAQ
Common Cake Problems
Q: Why is my marble cake dry?
A: The most common culprits are overbaking and incorrect flour measurement. Always measure flour by spooning it into your cup and leveling off. Check for doneness 5 minutes before the recommended bake time.
Q: Why did my cake sink in the middle?
A: This usually indicates over-mixing the batter or opening the oven door too early. Mix just until ingredients are combined, and avoid opening the oven for the first 25 minutes of baking.
Q: Why are my swirls muddy looking?
A: Over-swirling is the main cause. Remember, 2-3 gentle swirls per section is plenty. The batters will continue to marble slightly as they bake.
Ingredient Substitutions
| Original | Substitute | Notes |
|---|---|---|
| Cake flour | All-purpose flour minus 2 tbsp per cup | Slightly denser texture |
| Buttermilk | Milk + 1 tbsp vinegar | Let sit 5 minutes before using |
| Butter | Vegetable oil (¾ the amount) | Moister but less flavor |
| Dutch cocoa | Natural cocoa + pinch baking soda | Adjust for acidity difference |
Process Questions
Can I make this recipe as cupcakes?
Absolutely! Fill cupcake liners ¾ full and bake for 18-22 minutes at 350°F. Use a small spoon to dollop batters and a toothpick for mini swirls.
Can I prepare the batter ahead of time?
For best results, bake immediately after mixing. However, you can refrigerate the batter for up to 2 hours. Let it come to room temperature before baking and add 5-10 minutes to the bake time.
How do I know when the cake is perfectly done?
A toothpick inserted in the center should come out with just a few moist crumbs—not wet batter, but not completely clean either. The cake should also spring back lightly when touched.
Variations & Frosting Pairings
For a Gluten-Free Marble Cake
Replace cake flour with a gluten-free flour blend (I recommend King Arthur or Bob’s Red Mill 1:1 baking flour). Add 1 teaspoon xanthan gum if your blend doesn’t include it. The texture will be slightly denser but equally delicious.
For a Vegan Marble Cake
This vanilla and chocolate cake adapts beautifully to vegan preferences:
- Replace butter with vegan butter or coconut oil (solid, not melted)
- Substitute eggs with flax eggs (3 tablespoons ground flaxseed + 9 tablespoons water, let sit 5 minutes)
- Use plant-based milk with 1 tablespoon apple cider vinegar instead of buttermilk
Perfect Frosting Pairings
The beauty of marble cake lies in its versatility with frostings:
• Chocolate Fudge Frosting: Rich and decadent, perfect for chocolate lovers • Vanilla Bean Buttercream: Classic pairing that lets the marble pattern shine • Cream Cheese Frosting: Tangy sweetness that complements both flavors • Chocolate Ganache: For an elegant, professional finish • Simple Dusting: Sometimes just powdered sugar is perfect
Storing Your Marble Cake
Room Temperature Storage: Cover tightly and store for up to 3 days. The cake actually improves slightly on day two as flavors meld.
Freezing Instructions: Wrap individual slices in plastic wrap, then aluminum foil. Freeze for up to 3 months. Thaw at room temperature for 2-3 hours.
Frosted Cake Storage: If frosted with buttercream, refrigerate for up to 1 week. Bring to room temperature 30 minutes before serving for best texture.
Ready to create your masterpiece? This marble cake recipe combines time-tested techniques with modern baking science for results that will impress every time. Remember, great baking is equal parts technique and patience—trust the process, and you’ll be rewarded with a stunning cake that tastes as beautiful as it looks.
The Ultimate Baker’s Guide to Perfect Marble Cake
Course: cake ideas, DessertsCuisine: EuropeanServings
10
servingsPrep time
20
minutesCooking time
45
minutesCalories
320
kcalIngredients
2 cups all-purpose flour
1 cup granulated sugar
1 cup unsalted butter, softened
4 large eggs
1 cup milk
2 tsp baking powder
1 tsp vanilla extract
2 tbsp cocoa powder
Pinch of salt
Directions
- Preheat oven to 350°F (175°C). Grease and flour a loaf or bundt pan.
- Cream butter and sugar together in a mixing bowl until light and fluffy.
- Add eggs one at a time, beating well after each addition. Stir in vanilla extract.
- Mix dry ingredients (flour, baking powder, salt) in a separate bowl.
- Alternate adding dry ingredients and milk into the butter mixture, starting and ending with dry ingredients.
- Divide batter into two bowls. Stir cocoa powder into one portion until fully combined.
- Spoon batters alternately into the prepared pan. Use a knife to gently swirl the batters for a marble effect—don’t overmix.
- Bake for 40–50 minutes, or until a toothpick inserted into the center comes out clean.
- Cool in pan for 10 minutes, then transfer to a wire rack to cool completely before slicing.