The Best Fluffy Pancakes recipe you will fall in love with. Full of tips and tricks to help you make the best pancakes.
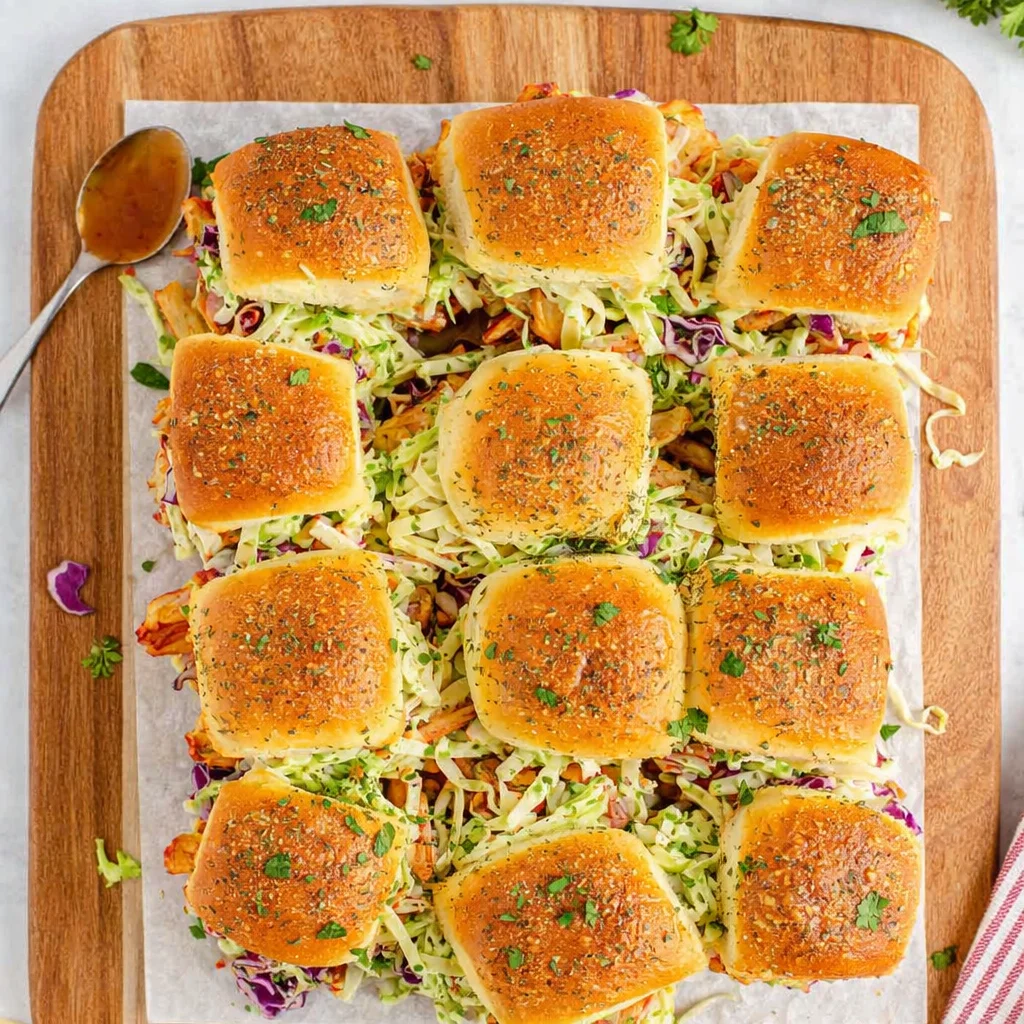
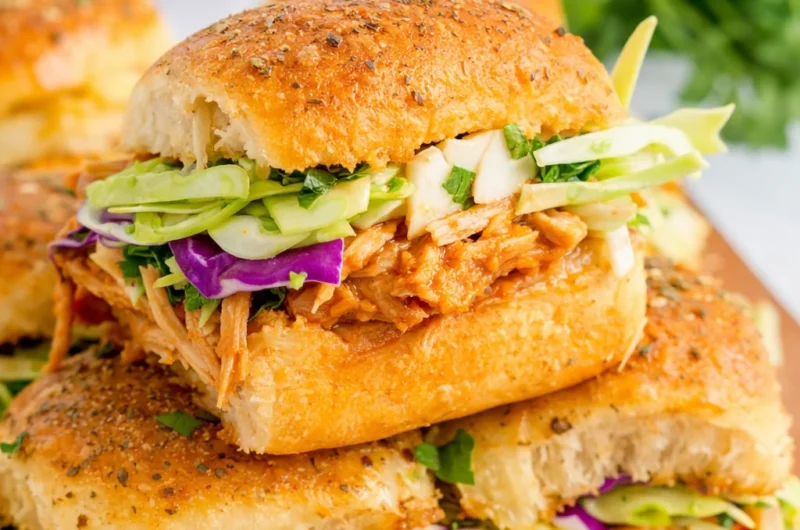
Crispy-Base Chicken Sliders (Never Soggy, Always Crowd-Pleasing)
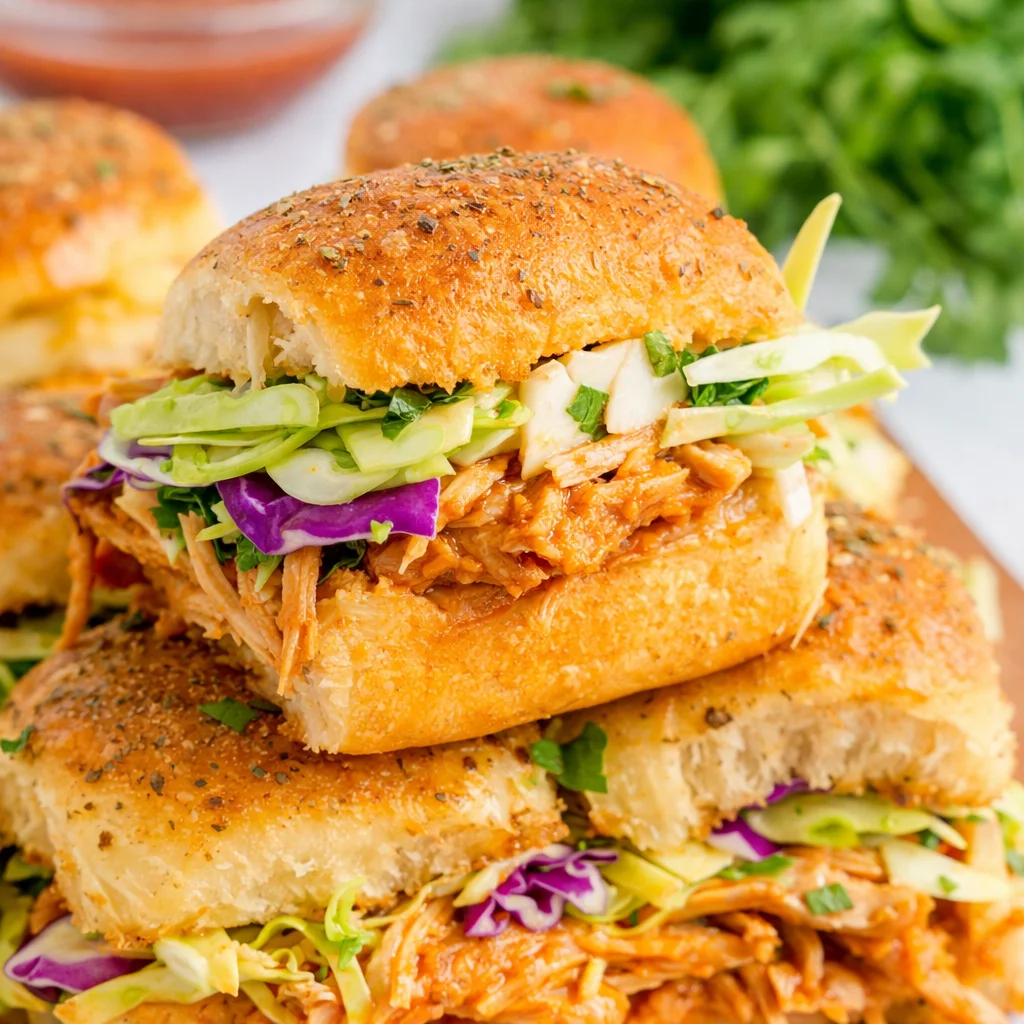
These chicken sliders are designed to fix the two biggest problems people complain about: soggy bottoms and dry top buns. Using a toast-first method, shredded rotisserie chicken, a balanced three-cheese blend, and a garlic–dijon butter glaze applied only to the top buns, these sliders stay crispy underneath and juicy inside for up to two hours. Total time: about 20 minutes, start to finish.
Why These Chicken Sliders Actually Work (Information Gain)
Most chicken slider recipes fail for one simple reason: moisture control. Chicken releases steam, cheese melts, and soft bread absorbs liquid like a sponge. The result is often sliders that look great out of the oven but collapse into a soggy mess within minutes.
This recipe solves that problem at the structural level. Toasting the bottom half of the buns first creates a dry, lightly crisp barrier that slows moisture absorption. Using a cheese blend instead of a single cheese improves both melt and “grip,” helping the filling stay in place. Finally, keeping the garlic butter glaze off the bottom buns prevents excess fat from soaking into the bread.
That combination is what makes these chicken sliders reliable, repeatable, and ideal for parties.
Ingredients (Built for Structure and Flavor)
The Base
- 12 Hawaiian rolls
- 3 cups shredded rotisserie chicken
- 1 cup shredded mozzarella
- 1 cup shredded provolone
- 1/4 cup finely grated parmesan
The Sauce
- 1/3 cup mayonnaise
- 1 tablespoon dijon mustard
- 1 teaspoon garlic powder
- Salt and black pepper to taste
The Glaze
- 4 tablespoons melted butter
- 1 teaspoon minced garlic
- 1 teaspoon dried parsley
These ingredients are chosen specifically to balance moisture, melt, and flavor in classic Hawaiian roll sliders.
Step-by-Step: Crispy-Base Chicken Sliders
Step 1: Prep the Base (The No-Soggy Secret)
Preheat the oven to 350°F. Slice the rolls horizontally, keeping them connected. Place only the bottom half of the rolls on a baking sheet and toast for 5 minutes until lightly golden.
This step seals the crumb and prevents the bottom from soaking up chicken juices.
Step 2: Build the Chicken Layer
In a bowl, mix the shredded chicken with mayonnaise, dijon mustard, garlic powder, salt, and pepper. Spread the mixture evenly over the toasted bottom buns.
Using rotisserie chicken keeps prep fast and ensures juicy meat, making this recipe perfect for slider sandwiches for a crowd.
Step 3: The Cheese Matrix
Sprinkle mozzarella, provolone, and parmesan evenly over the chicken layer. This blend melts smoothly, stretches well, and holds the filling together better than a single cheese.
Step 4: Add the Top Buns and Glaze
Place the top buns over the cheese. Brush the garlic butter glaze only on the top buns, not the sides or bottom. This keeps the tops flavorful without weighing down the structure.
Step 5: Bake and Rest
Cover loosely with foil and bake for 10 minutes, then uncover and bake for another 5 minutes until the cheese is melted and the tops are lightly golden. Let the sliders rest for 5 minutes before slicing.
Nutrition Snapshot (Per Slider, Approximate)
- Calories: 260
- Protein: 15g
- Fat: 14g
- Carbohydrates: 18g
These chicken sliders deliver a solid protein-to-carb balance while still feeling indulgent.
Common Problems and Fixes
Why are my chicken sliders soggy?
Usually the buns were not toasted first or the glaze was brushed on the bottom buns. Toasting and controlled butter placement fix this completely.
Why are my top buns dry?
The glaze was too thin or baked uncovered too long. Covering with foil during the first bake traps enough steam to keep the tops tender.
Can I make these ahead of time?
Yes. Assemble up to 6 hours ahead, refrigerate, and bake just before serving. This makes them excellent party appetizers.
Variations and Serving Ideas
- Add sliced pickles for crunch and acidity
- Swap provolone for pepper jack for heat
- Serve with a simple green salad or roasted potatoes
These sliders also work well for game days, potlucks, and casual family dinners.
Final Thoughts
Great chicken sliders are not about piling on ingredients—they’re about controlling moisture and structure. By fixing the technical problems most recipes ignore, this version delivers sliders that stay crispy, cheesy, and satisfying from the first bite to the last.
If you’ve struggled with soggy sliders before, this method will permanently change how you make them.
Crispy-Base Chicken Sliders (Never Soggy, Always Crowd-Pleasing)
Course: Lunch, Recipe CollectionsCuisine: AmericanServings
8
servingsPrep time
20
minutesCooking time
35
minutesCalories
280
kcalIngredients
2 cups cooked chicken breast, shredded or finely chopped
8 slider buns
1 cup shredded cheddar cheese
1/2 cup mayonnaise
1 tablespoon Dijon mustard
1 tablespoon olive oil or melted butter
1/2 teaspoon garlic powder
1/2 teaspoon paprika
Salt and black pepper, to taste
Optional toppings: lettuce, pickles, sliced tomatoes
Directions
- Preheat the oven to 180°C / 350°F.
- In a mixing bowl, combine the cooked chicken, mayonnaise, Dijon mustard, garlic powder, paprika, salt, and pepper. Mix well.
- Slice the slider buns in half horizontally and place the bottom halves on a baking tray.
- Spread the chicken mixture evenly over the buns.
- Sprinkle shredded cheddar cheese on top of the chicken layer.
- Cover with the top halves of the buns.
- Brush the tops lightly with olive oil or melted butter.
- Bake for 15–20 minutes, or until the cheese is melted and the tops are lightly golden.
- Remove from the oven, add optional toppings if desired, and serve warm.