The Best Fluffy Pancakes recipe you will fall in love with. Full of tips and tricks to help you make the best pancakes.
Guide to Spooktacular Halloween Brownies: Recipes, Decorating Ideas & Party Tips
There’s something magical about Halloween baking that brings out the creative spirit in all of us. Whether you’re planning a spooky Halloween party, searching for the perfect classroom treat, or simply want to celebrate the season with something deliciously frightening, Halloween brownies are the answer. These chocolate treats offer the perfect canvas for your most ghoulish decorating ideas while satisfying every sweet tooth at your gathering.
You’re getting not just one, but multiple easy recipes and decorating ideas that will transform ordinary brownies into show-stopping Halloween desserts. Our fudgy, chewy base recipe creates the perfect foundation for graveyard scenes, creepy mummies, spiderwebs, and more. Let’s dive into the ultimate collection of spooky brownie recipes that will make your Halloween celebration unforgettable.
The Perfect Base Brownie Recipe: Your Spooky Foundation
Every great Halloween treat starts with an exceptional brownie. This recipe delivers that coveted fudgy center with a perfectly crackly top—ideal for all your decorating adventures.
Ingredients
Metric Measurements:
- 225g unsalted butter, melted
- 400g granulated sugar
- 4 large eggs
- 120ml vegetable oil
- 2 teaspoons vanilla extract
- 165g all-purpose flour
- 100g unsweetened cocoa powder
- 1 teaspoon salt
- 180g chocolate chips (optional)
Imperial Measurements:
- 1 cup unsalted butter, melted
- 2 cups granulated sugar
- 4 large eggs
- ½ cup vegetable oil
- 2 teaspoons vanilla extract
- 1⅓ cups all-purpose flour
- ¾ cup unsweetened cocoa powder
- 1 teaspoon salt
- 1 cup chocolate chips (optional)
Instructions
- Preheat and Prepare: Set your oven to 350°F (175°C). Line a 9×13-inch baking pan with parchment paper, leaving overhang on the sides for easy removal—this is crucial for clean cuts and professional-looking Halloween brownie bars.
- Mix Wet Ingredients: In a large bowl, whisk together melted butter, sugar, eggs, oil, and vanilla until smooth and glossy. Pro tip: Don’t overmix to prevent tough brownies.
- Combine Dry Ingredients: In a separate bowl, sift together flour, cocoa powder, and salt. This ensures a lump-free batter.
- Bring it Together: Gently fold the dry ingredients into the wet mixture until just combined. Fold in chocolate chips if using.
- Bake to Perfection: Pour batter into prepared pan and bake for 25-30 minutes. The brownies are done when a toothpick inserted comes out with a few moist crumbs (not wet batter). Remember: Slightly underbaked is better than overbaked for that fudgy texture.
- Cool Completely: Let brownies cool in the pan for at least 2 hours before decorating. For best results, refrigerate for 1 hour before cutting.
Spooktacular Decorating Ideas: Transform Your Brownies
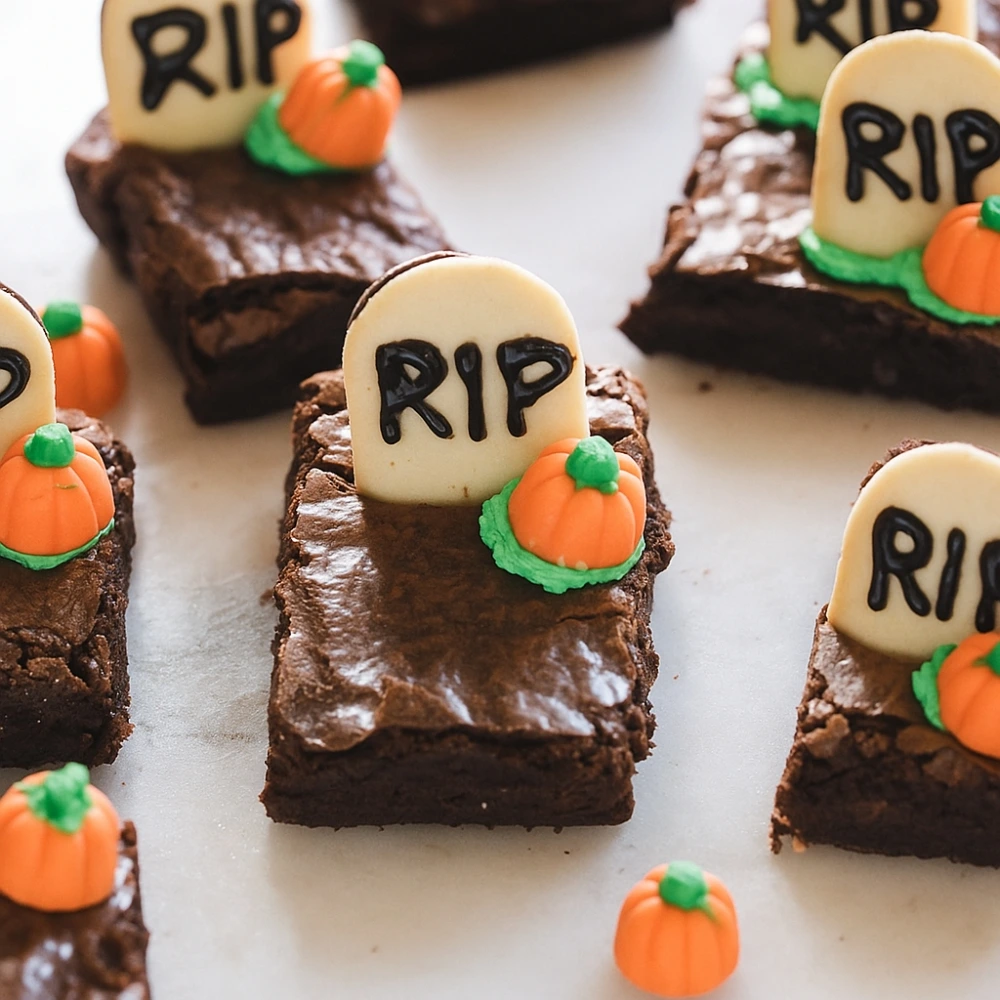
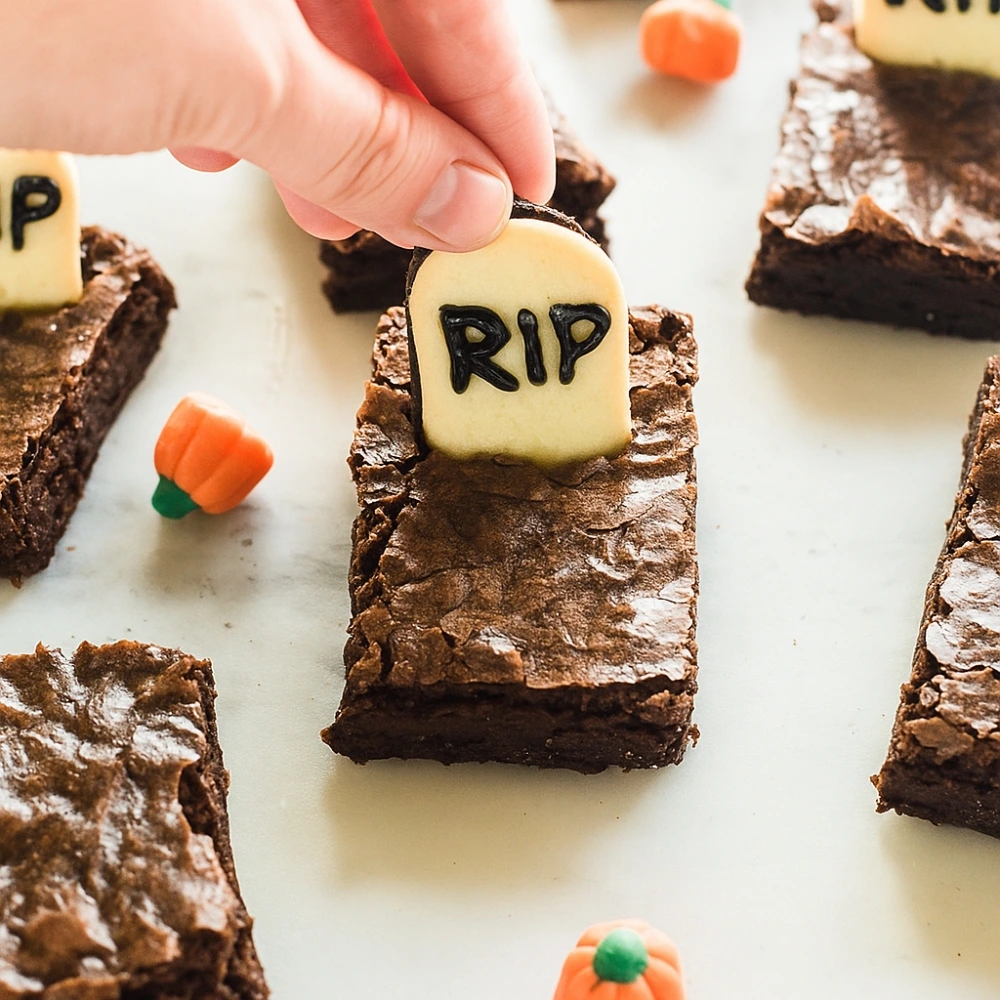
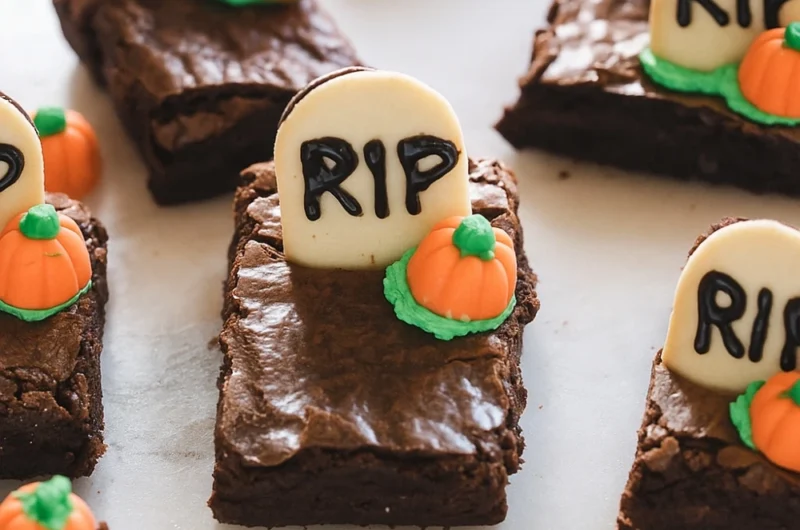
1. Elevated Graveyard Brownies
Ready to bring your brownies back from the dead? Our version takes the classic graveyard scene to the next level with multi-dimensional elements that create an eerie, realistic cemetery.
What You’ll Need:
- Base brownies, cooled and cut into squares
- 2 cups chocolate frosting
- 10-12 Milano cookies (for tombstones)
- Black food decorating gel
- Crushed Oreos (for “dirt”)
- Candy pumpkins
- Gummy worms
Steps:
- Spread a thin layer of chocolate frosting over cooled brownies
- Sprinkle crushed Oreos generously to create dirt texture
- Write “RIP” and spooky phrases on Milano cookies with black gel
- Insert cookie tombstones vertically into brownies
- Add candy pumpkins and strategically place gummy worms emerging from the “ground”
Pro Tip: Chill your brownies before cutting for cleaner edges and more professional-looking treats.
2. Adorable (or Ghastly) Mummy Brownies
These wrapped wonders offer versatility—go cute for kids or creepy for adults with just a change of expression!
What You’ll Need:
- Base brownies, cut into rectangles
- 2 cups white chocolate, melted
- Candy eyeballs (various sizes for character)
- Piping bag or zip-lock bag
Steps:
- Cut brownies into mummy-sized rectangles (approximately 2×4 inches)
- Melt white chocolate until smooth
- Transfer to piping bag and cut a small opening
- Pipe white chocolate in crisscross “bandage” patterns across each brownie
- While chocolate is still wet, place 2 candy eyes in the gap
- Refrigerate 15 minutes to set
Variation Ideas:
- Friendly Mummies: Use large, round candy eyes placed close together
- Scary Mummies: Use small eyes with irregular wrapping for a more disturbing look
- Mixed Emotions: Create a family of mummies with different expressions
3. Creepy Crawly Spiderweb Brownies
These elegant yet spooky Halloween brownies impress guests with minimal effort using a simple technique that looks professional.
What You’ll Need:
- Base brownies with chocolate ganache topping
- ½ cup white chocolate, melted
- Toothpick
- Plastic spider rings (optional)
Ganache Recipe:
- 1 cup heavy cream
- 8 oz dark chocolate, chopped
Steps:
- Make ganache by heating cream until simmering, then pouring over chopped chocolate. Stir until smooth
- Spread ganache evenly over cooled brownies
- While ganache is still wet, pipe concentric circles of white chocolate on top
- Immediately drag a toothpick from center outward in 8 sections to create web effect
- Place plastic spider decorations on web
- Let set for 30 minutes before cutting
Pro Tip: Work quickly before the ganache sets. If it starts hardening, gently warm it with a hairdryer on low heat.
4. Monster Mash Brownie Bites
Perfect for Halloween parties, these colorful creatures let kids and adults unleash their creativity with endless customization options.
What You’ll Need:
- Base brownies, cut into bite-sized squares
- Frosting in various colors (green, purple, orange)
- Candy eyes (assorted sizes)
- Rainbow sprinkles
- Mini chocolate chips
- Shredded coconut (dyed green for “hair”)
Steps:
- Cut brownies into 1-inch squares
- Top each with a dollop of colored frosting
- Create monster faces using candy eyes and mini chocolate chip “mouths”
- Add sprinkle details or coconut hair
- Let creativity run wild—no two monsters should look alike!
Party Hack: Set up a decorating station with all supplies and let guests create their own monsters.
5. Oozing Slime or Blood Brownies
These dramatically dripping treats create that perfect “gross-out” factor that Halloween lovers crave.
What You’ll Need:
- Base brownies
- 1 cup powdered sugar
- 2-3 tablespoons milk
- Green or red food coloring
- ½ teaspoon vanilla extract
Steps:
- Mix powdered sugar, milk, and vanilla until smooth
- Add food coloring: bright green for slime, deep red for blood
- Adjust consistency (should slowly drip off a spoon)
- Drizzle over brownies in irregular patterns
- Let some drip down the sides for dramatic effect
Color Tips:
- For realistic blood: Mix red with a tiny drop of blue
- For toxic slime: Use neon green gel coloring
6. Pumpkin Patch Brownies
Bring the autumn harvest to your dessert table with these festive, family-friendly decorated brownies.
What You’ll Need:
- Base brownies
- 2 cups orange frosting
- Green frosting or gel
- Candy corn
- Pretzel sticks
Steps:
- Frost brownies entirely with orange frosting
- Use green frosting to pipe vine designs across the top
- Create pumpkins by arranging candy corn in circular patterns
- Add small pretzel stick pieces as pumpkin stems
- Optional: Score lines with a toothpick to create pumpkin sections
Expert Tips for Perfect Halloween Brownies Every Time
Troubleshooting Common Issues
| Problem | Cause | Solution |
|---|---|---|
| Dry, cakey brownies | Overbaking or too much flour | Reduce baking time by 3-5 minutes; measure flour by weight |
| Brownies stick to pan | Insufficient greasing | Always use parchment paper with overhang |
| Uneven baking | Hot spots in oven | Rotate pan halfway through baking time |
| Decorations slide off | Brownies not cooled | Cool completely and refrigerate before decorating |
Dietary Modifications
Gluten-Free: Replace all-purpose flour with 1:1 gluten-free baking flour. Add ¼ teaspoon xanthan gum if your blend doesn’t include it.
Dairy-Free: Substitute butter with coconut oil and use dairy-free chocolate chips. For frosting decorations, use vegan butter alternatives.
Reduced Sugar: Replace half the sugar with unsweetened applesauce, though texture will be slightly less fudgy.
Make-Ahead & Storage Strategy
Planning a Halloween party? Bake brownies up to 3 days ahead. Store undecorated in an airtight container at room temperature. Decorate 1-2 days before serving for maximum freshness.
Freezing Guidelines:
- Unfrosted brownies freeze beautifully for up to 3 months
- Wrap individual pieces in plastic wrap, then place in freezer bags
- Thaw overnight in refrigerator before decorating
- Do not freeze decorated brownies with fresh frosting
Time-Saving Hacks for Busy Schedules
- Use Store-Bought Base: Quality boxed brownie mix works perfectly—focus your energy on creative decorating
- Pre-Made Frosting: No shame in using canned frosting; add your own food coloring
- Assembly Line Method: If making multiple designs, prep all brownies first, then decorate in batches
- Kid-Friendly Shortcuts: Pre-place candy eyes on parchment paper for quick grabbing during decorating
Safety Considerations
When decorating with children, remember:
- Keep small candies away from toddlers (choking hazard)
- Use food-safe decorations only—check that all items are edible
- Supervise use of food coloring to prevent stains
- Provide wet wipes for easy cleanup
Party Planning & Presentation Ideas
Serving Suggestions
Transform your Halloween brownies into a showstopping display:
- Individual Wrappers: Place each decorated brownie in a clear cellophane bag tied with orange and black ribbon
- Themed Platter: Arrange on a black serving board with dry ice for fog effect (keep ice away from food)
- Dessert Table Tiers: Use cake stands at varying heights to create visual interest
- Labels: Create small tent cards naming each design (“Graveyard Ghoulies,” “Mummy Madness,” etc.)
Perfect Pairings
Enhance your spooky brownie recipes with complementary beverages:
- Cold milk shooters in small bottles with striped straws
- Pumpkin spice latte for adult gatherings
- “Witch’s Brew” punch (purple grape juice with lime sherbet)
- Hot apple cider with cinnamon sticks
Halloween Dessert Table Inspiration
Create an immersive experience by coordinating your brownie display with:
- Black lace tablecloth overlays
- LED candles in vintage holders
- Scattered fall leaves and mini pumpkins
- Cobweb decorations (keep away from food)
- Themed serving utensils with skeleton or witch handles
Your Halloween Baking Adventure Awaits
With this comprehensive guide to Halloween brownies, you’re equipped to create everything from classic graveyard scenes to innovative monster designs. These chocolate brownies provide the perfect combination of delicious flavor and creative potential, making them ideal for Halloween celebrations of any size.
The beauty of these recipes lies in their flexibility. Whether you’re an experienced baker looking for showstopping Halloween desserts or a parent seeking simple Halloween treats for school parties, you’ll find options that match your skill level and time constraints.
Which spooky brownie will you make first? Share your creations in the comments below or tag us on Instagram using #MySpookyBrownies—we love seeing your deliciously frightening results!
Don’t forget to:
- 📌 Pin this recipe for easy access when Halloween planning begins
- 📧 Subscribe to our newsletter for more seasonal baking inspiration
- 🎃 Download our printable recipe card for easy kitchen reference
Happy Halloween baking, and may your treats be frighteningly delicious!
Guide to Spooktacular Halloween Brownies: Recipes, Decorating Ideas & Party Tips
Course: DessertsCuisine: AmericanServings
16
squaresPrep time
15
minutesCooking time
25
minutesCalories
260
kcalIngredients
170 g (¾ cup) unsalted butter, melted and slightly cooled
200 g (1 cup) granulated sugar
110 g (½ cup, packed) light brown sugar
2 large eggs + 1 large egg yolk, room temp
2 tsp vanilla extract
80 g (¾ cup) natural cocoa powder
125 g (1 cup) all-purpose flour
½ tsp fine salt
90 g (½ cup) chocolate chips or chunks
Halloween decoration (choose your vibe)
120 g (1 cup) powdered sugar
30 g (2 tbsp) unsalted butter, very soft
1–2 tbsp milk (as needed)
Gel food coloring (orange + black)
Candy eyeballs, chocolate sprinkles, mini pretzels, candy corn (optional)
Directions
- Prep. Heat oven to 175°C/350°F. Line a 23×33 cm (9×13 in) pan with parchment, leaving overhang.
- Mix wet. In a large bowl whisk melted butter, granulated sugar, and brown sugar until glossy (30–45 sec). Whisk in eggs, yolk, and vanilla until smooth.
- Add dry. Sift in cocoa, flour, and salt. Fold just until no dry streaks remain. Fold in chocolate chips. Do not overmix.
- Bake. Spread batter evenly in the pan. Bake 22–26 minutes, until a toothpick comes out with a few moist crumbs (not wet batter).
- Cool. Place pan on a rack; cool completely (at least 45–60 min) before decorating.
- Make frosting. Beat powdered sugar with soft butter; add milk 1 tsp at a time to a pipeable consistency. Tint portions orange and black.
- Decorate.
- Spider webs: Drizzle black frosting in concentric circles; drag a toothpick outward to web lines; add candy eyes.
- Pumpkin patch: Spread orange frosting in patches; add chocolate sprinkles as “soil”; press in candy corn; add eyes for “monsters.”
- Slice & serve. Lift brownies using parchment. Warm a large knife under hot water, wipe dry, and cut into 16 squares. Store covered at room temp 2–3 days or refrigerate up to 5 days; freeze (undecorated) up to 2 months.