The Best Fluffy Pancakes recipe you will fall in love with. Full of tips and tricks to help you make the best pancakes.
Homemade Cherry Jam Recipe (4 Ways: Classic, Small-Batch, No Pectin & Low-Sugar)
Tired of searching for the perfect cherry jam recipe only to find one that’s too big, too complicated, or too sugary? You’re in the right place. Whether you’re dealing with a single pound of fresh cherries from your farmers market haul or working with a massive harvest from your backyard tree, this comprehensive guide has you covered.
This single post provides four tested methods for making delicious homemade cherry jam, ensuring you can create the perfect preserve no matter what kind of cherries you have, what your dietary needs are, or how much time you want to invest. From a classic crowd-pleasing recipe to a quick small-batch version, plus innovative no-pectin and low-sugar alternatives, you’ll never need to search for another cherry jam recipe again.
Why This is the Only Cherry Jam Recipe You’ll Ever Need
Here’s what makes this guide your ultimate cherry jam resource:
- Four complete recipes in one comprehensive post – covering every possible scenario and preference
- Pro-tips for achieving the perfect set every time – no more runny or overly thick jam disasters
- Detailed troubleshooting section – solutions for common cherry jam problems
- Safe canning instructions for long-term storage – preserve your harvest for months
- Visual step-by-step guide – see exactly what each stage should look like
- Expert equipment recommendations – from basic essentials to game-changing tools
Essential Equipment & Ingredients
Equipment You’ll Need
Basic Essentials:
- Heavy-bottomed pot (4-6 quart capacity)
- Wooden spoon or heat-resistant silicone spatula
- Glass canning jars with new lids
- Ladle
- Small plates (for testing doneness)
Expert-Level Tools (Worth the Investment):
- Cherry pitter – saves hours of tedious work
- Digital kitchen scale – ensures consistent results
- Canning funnel – prevents messy jar filling
- Candy thermometer – takes guesswork out of gel point
- Fine-mesh skimmer – removes foam efficiently
The Holy Trinity of Jam Making
Understanding these three core ingredients will transform your jam-making success:
Fruit (Cherries): Provides flavor, color, and natural pectin. A mix of slightly underripe and ripe cherries gives the best texture.
Sugar: Not just for sweetness – sugar acts as a preservative and helps achieve proper gel consistency. Different sugars create different textures and flavors.
Acid (Lemon Juice): Essential for both flavor balance and proper gel formation. The acid helps activate natural pectin and prevents the jam from becoming overly sweet.
Choose Your Cherry Jam Adventure
First, choose the recipe that’s right for your situation and preferences:
Option 1: The Classic Crowd-Pleaser – Perfect for large batches and traditional canning Option 2: The Quick Small-Batch – Ideal when you have just a pint or two of cherries
Option 3: The All-Natural (No Pectin Added) – For those avoiding commercial additives Option 4: The Easy Low-Sugar/Keto-Friendly – Great for reduced-sugar diets
Recipe 1: The Classic Homemade Cherry Jam
Ingredients:
- 2 pounds fresh cherries, pitted and roughly chopped
- 1½ cups granulated sugar
- ¼ cup fresh lemon juice
- 1 packet (1.75 oz) fruit pectin
- 1 tablespoon butter (optional, reduces foaming)
Instructions:
- Prepare your cherries: Remove stems and pits, then roughly chop. Don’t worry about making them perfectly uniform – some texture is desirable.
- Macerate the fruit: Combine cherries, sugar, and lemon juice in your heavy-bottomed pot. Let sit for 15-30 minutes, stirring occasionally, until cherries release their juices.
- Begin cooking: Bring mixture to a rolling boil over medium-high heat, stirring frequently. Add butter if using to reduce foam.
- Add pectin: Stir in pectin and return to a full rolling boil. Boil hard for exactly 1 minute, stirring constantly.
- Test for doneness: Use the wrinkle test (see visual guide below) or check that temperature reaches 220°F.
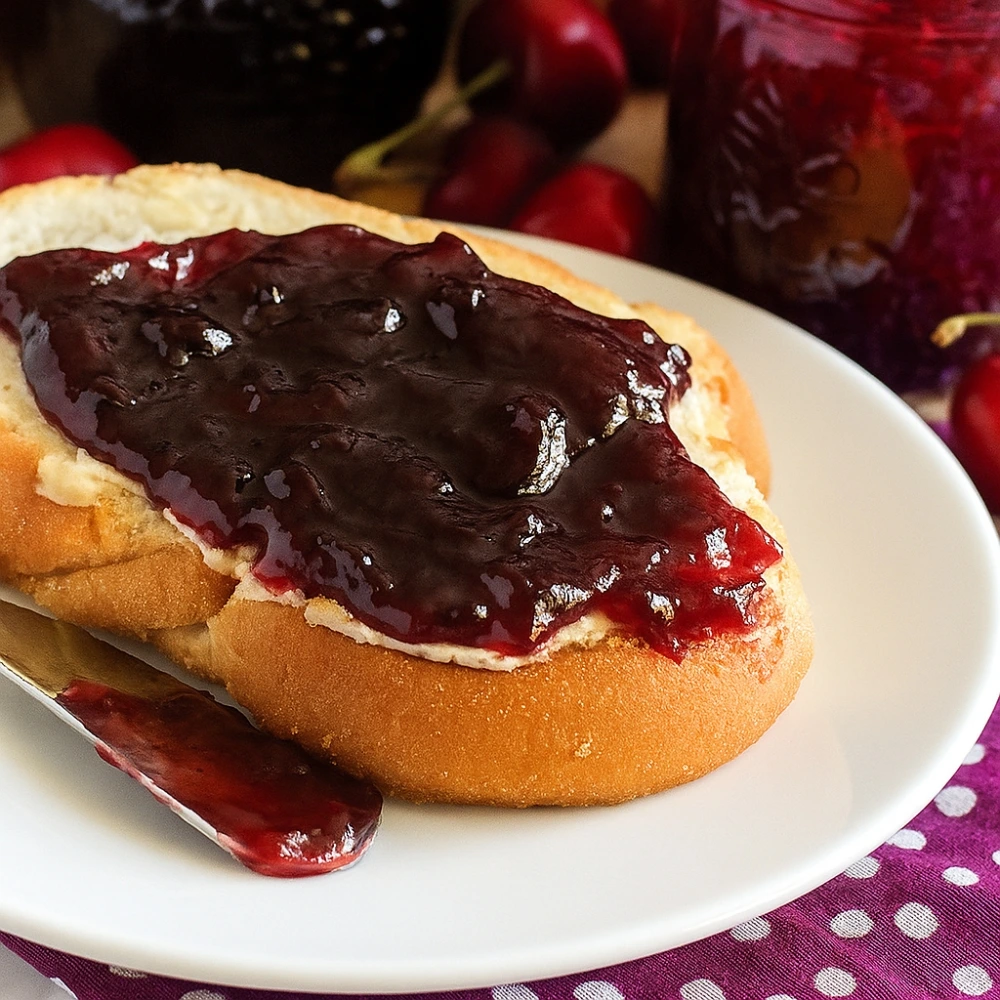
- Finish and jar: Remove from heat, skim any foam, and ladle into prepared jars.
Yield: Approximately 3-4 half-pint jars
Recipe 2: The Quick Small-Batch Cherry Jam
Ingredients:
- 1 pound fresh cherries, pitted and chopped
- ¾ cup granulated sugar
- 2 tablespoons fresh lemon juice
- ½ teaspoon vanilla extract (optional)
Instructions:
- Quick start: Combine all ingredients in a medium saucepan and let sit for 10 minutes.
- Fast cooking method: Bring to a boil over medium-high heat, then reduce to medium and cook for 12-15 minutes, stirring frequently.
- Check consistency: Jam should coat the back of a spoon and pass the wrinkle test.
- Cool and store: Let cool completely before transferring to clean jars.
Yield: Approximately 1-2 half-pint jars Storage: Refrigerate up to 3 weeks
Recipe 3: The All-Natural (No Pectin Added)
Ingredients:
- 2 pounds fresh cherries (mix of ripe and slightly underripe)
- 1¼ cups sugar
- 3 tablespoons fresh lemon juice
- 1 tablespoon lemon zest
Instructions:
- Enhance natural pectin: Use a mix of ripe and slightly underripe fruit for better natural gel formation.
- Slow and steady: Cook fruit and sugar mixture over medium-low heat for 25-35 minutes, stirring regularly.
- Concentrate flavors: The longer cooking time intensifies the cherry flavor naturally.
- Test thoroughly: Without added pectin, proper gel formation takes longer – be patient with testing.
Yield: Approximately 2-3 half-pint jars
Recipe 4: The Easy Low-Sugar/Keto-Friendly
Ingredients:
- 2 pounds fresh cherries, pitted
- ½ cup erythritol or stevia blend (to taste)
- ¼ cup fresh lemon juice
- 2 tablespoons chia seeds (natural thickener)
- 1 packet sugar-free pectin
Instructions:
- Alternative sweetening: Start with less sweetener and adjust to taste – cherries vary in natural sweetness.
- Thickening strategy: Chia seeds provide natural thickening without affecting flavor significantly.
- Modified cooking: Follow similar method to classic recipe but monitor consistency more carefully.
- Storage note: Lower sugar content means shorter shelf life – consume within 2 weeks when refrigerated.
Yield: Approximately 2-3 half-pint jars
The Step-by-Step Visual Guide
Success in jam making comes from recognizing the visual and tactile cues at each stage:
Stage 1 – Pitting Cherries: Look for cherries that give slightly to pressure but aren’t mushy. A cherry pitter speeds this process dramatically, but a chopstick or paperclip works in a pinch.
Stage 2 – Maceration Magic: After combining fruit and sugar, you’ll see the cherries begin to release their juices within 15 minutes. This natural syrup is the foundation of great jam.
Stage 3 – The Rolling Boil: A proper rolling boil can’t be stirred down – bubbles continue breaking the surface even when stirred vigorously.
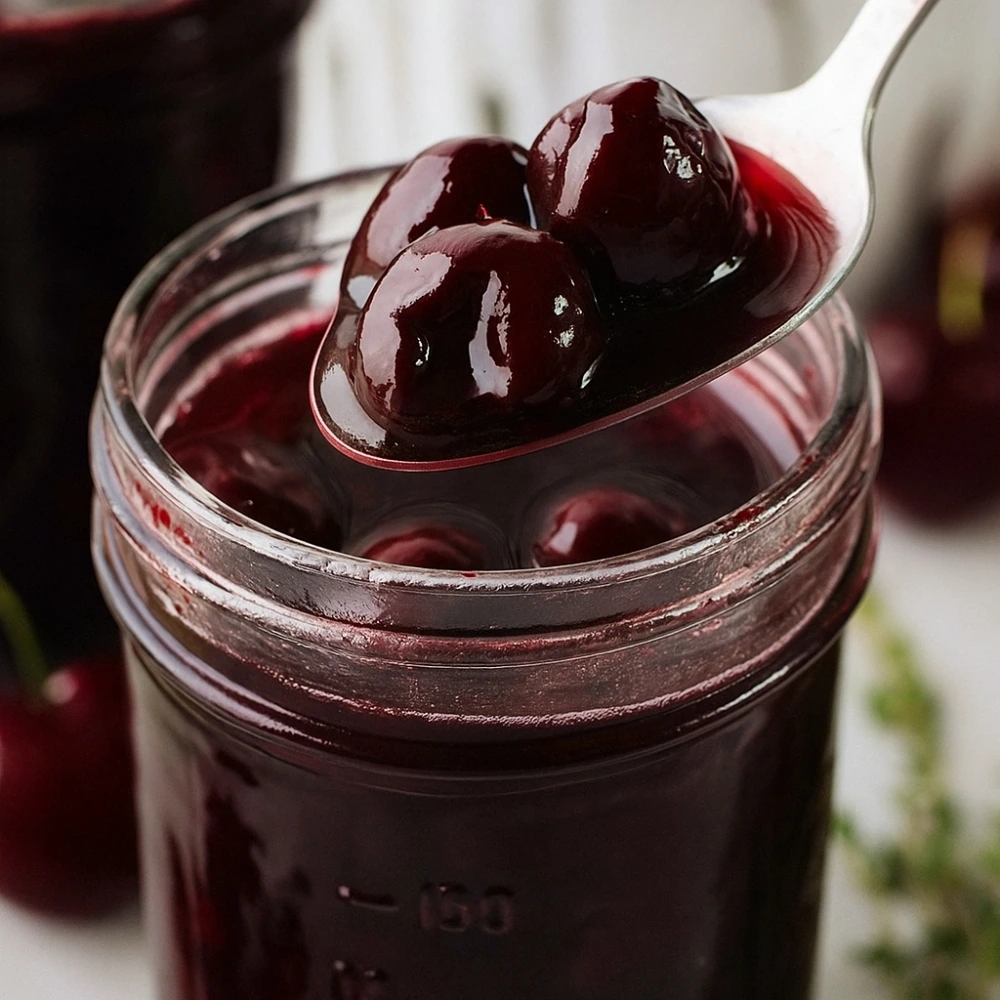
Stage 4 – The Wrinkle Test: Place a small plate in your freezer before starting. To test doneness, drop a small amount of jam on the cold plate. If it wrinkles when pushed with your finger, it’s ready.
Stage 5 – Skimming Foam: Light pink foam will rise to the surface during cooking. While edible, removing it creates a clearer, more professional-looking jam.
Stage 6 – Proper Jar Filling: Leave ¼ inch headspace in jars for proper sealing and expansion during processing.
Pro-Tips from a Jam Expert
Here are the insider secrets that separate good jam from extraordinary jam:
- For firmer set: Add 1 tablespoon of lemon juice beyond what the recipe calls for, or include some cherry pits (wrapped in cheesecloth) during cooking for extra natural pectin.
- Vibrant color secret: A drop of almond extract or a splash of kirsch enhances the cherry flavor and helps maintain that beautiful red color.
- Overnight maceration advantage: For deeper flavor, combine fruit and sugar the night before cooking. The extended maceration creates more complex flavors.
- Temperature matters: Jam reaches gel point at 220°F at sea level. Adjust down 2°F for every 1,000 feet of elevation.
- The plate test never lies: Cold plate testing is more reliable than temperature for determining doneness, especially in humid conditions.
Troubleshooting: What Went Wrong?
Problem: My jam is too runny Solution: Return to pot, add 1 tablespoon lemon juice and 1 teaspoon pectin mixed with 2 tablespoons sugar. Boil hard for 2 minutes. This works even after jarring – just empty jars back into pot.
Problem: My jam is too thick or grainy Solution: This usually happens from overcooking or too much pectin. Next time, reduce cooking time or pectin amount. For current batch, thin with a little water or fruit juice while warm.
Problem: Excessive foaming during cooking Solution: Add 1 tablespoon butter at the beginning of cooking, reduce heat slightly, or skim more frequently. High pectin fruit naturally foams more.
Problem: Can I substitute sour cherries for sweet? Solution: Absolutely! Reduce sugar by ¼ cup and add an extra tablespoon of lemon juice. Sour cherries often have more natural pectin, so watch for faster gel formation.
Problem: Jam didn’t gel after 24 hours Solution: This happens. Empty jars back into pot, add 1 package pectin mixed with ¼ cup sugar, bring to rolling boil for 1 minute. Re-jar immediately.
Storage & Safe Canning Instructions
Refrigerator Storage (Simple Option)
For immediate consumption, properly made jam stores in the refrigerator for:
- Regular sugar recipes: 3-4 weeks
- Low-sugar recipes: 2-3 weeks
- Always use clean utensils when scooping to prevent contamination
Long-Term Storage (Water Bath Canning)
For shelf-stable jam that lasts 1-2 years:
- Prepare canning setup: Fill large pot with enough water to cover jars by 1 inch. Bring to simmer.
- Sterilize jars: Wash jars and lids in hot soapy water. Keep jars hot in simmering water until ready to fill.
- Fill hot jars: Ladle hot jam into hot jars, leaving ¼ inch headspace. Wipe jar rims clean.
- Apply lids: Center new lids on jars and apply bands finger-tight only.
- Process in boiling water: Submerge filled jars in boiling water for 10 minutes (adjust for altitude per USDA guidelines).
- Cool completely: Remove jars and let cool undisturbed for 12-24 hours. Check that lids have sealed (they shouldn’t flex when pressed).
Important: Always consult current USDA canning guidelines or the National Center for Home Food Preservation for the most up-to-date safety information.
Ready to start your cherry jam adventure? Pick your recipe above and transform those beautiful cherries into jars of summer sunshine that’ll brighten your breakfast table all year long. Don’t forget to share your results – there’s nothing quite like the satisfaction of homemade jam made perfectly to your taste!

Homemade Cherry Jam Recipe (4 Ways: Classic, Small-Batch, No Pectin & Low-Sugar)
Cuisine: Americanhalf-pint jars
4
half-pint jarsPrep time
15
minutesCooking time
30
minutesCalories
45
kcalIngredients
4 cups fresh pitted cherries
2 tablespoons lemon juice
1 package (1.75 oz) fruit pectin
4 cups granulated sugar
Directions
- In a large saucepan, combine the cherries and lemon juice.
- Use a potato masher to crush the cherries slightly.
- Stir in the pectin and bring to a boil over medium-high heat.
- Add sugar all at once, stirring constantly.
- Bring the mixture back to a full rolling boil. Boil for 1–2 minutes.
- Remove from heat and skim off any foam.
- Carefully ladle jam into sterilized jars, leaving ¼ inch headspace.
- Wipe rims, apply lids, and process in a boiling water bath for 10 minutes.
- Let jars cool undisturbed for 12–24 hours before storing.